Comment pochoir un mur pour créer un espace époustouflant !
Les pochoirs muraux sont peu coûteux, faciles à utiliser et donnent à n'importe quelle pièce un style instantané. Apprenez à peindre un mur au pochoir pour un look époustouflant !
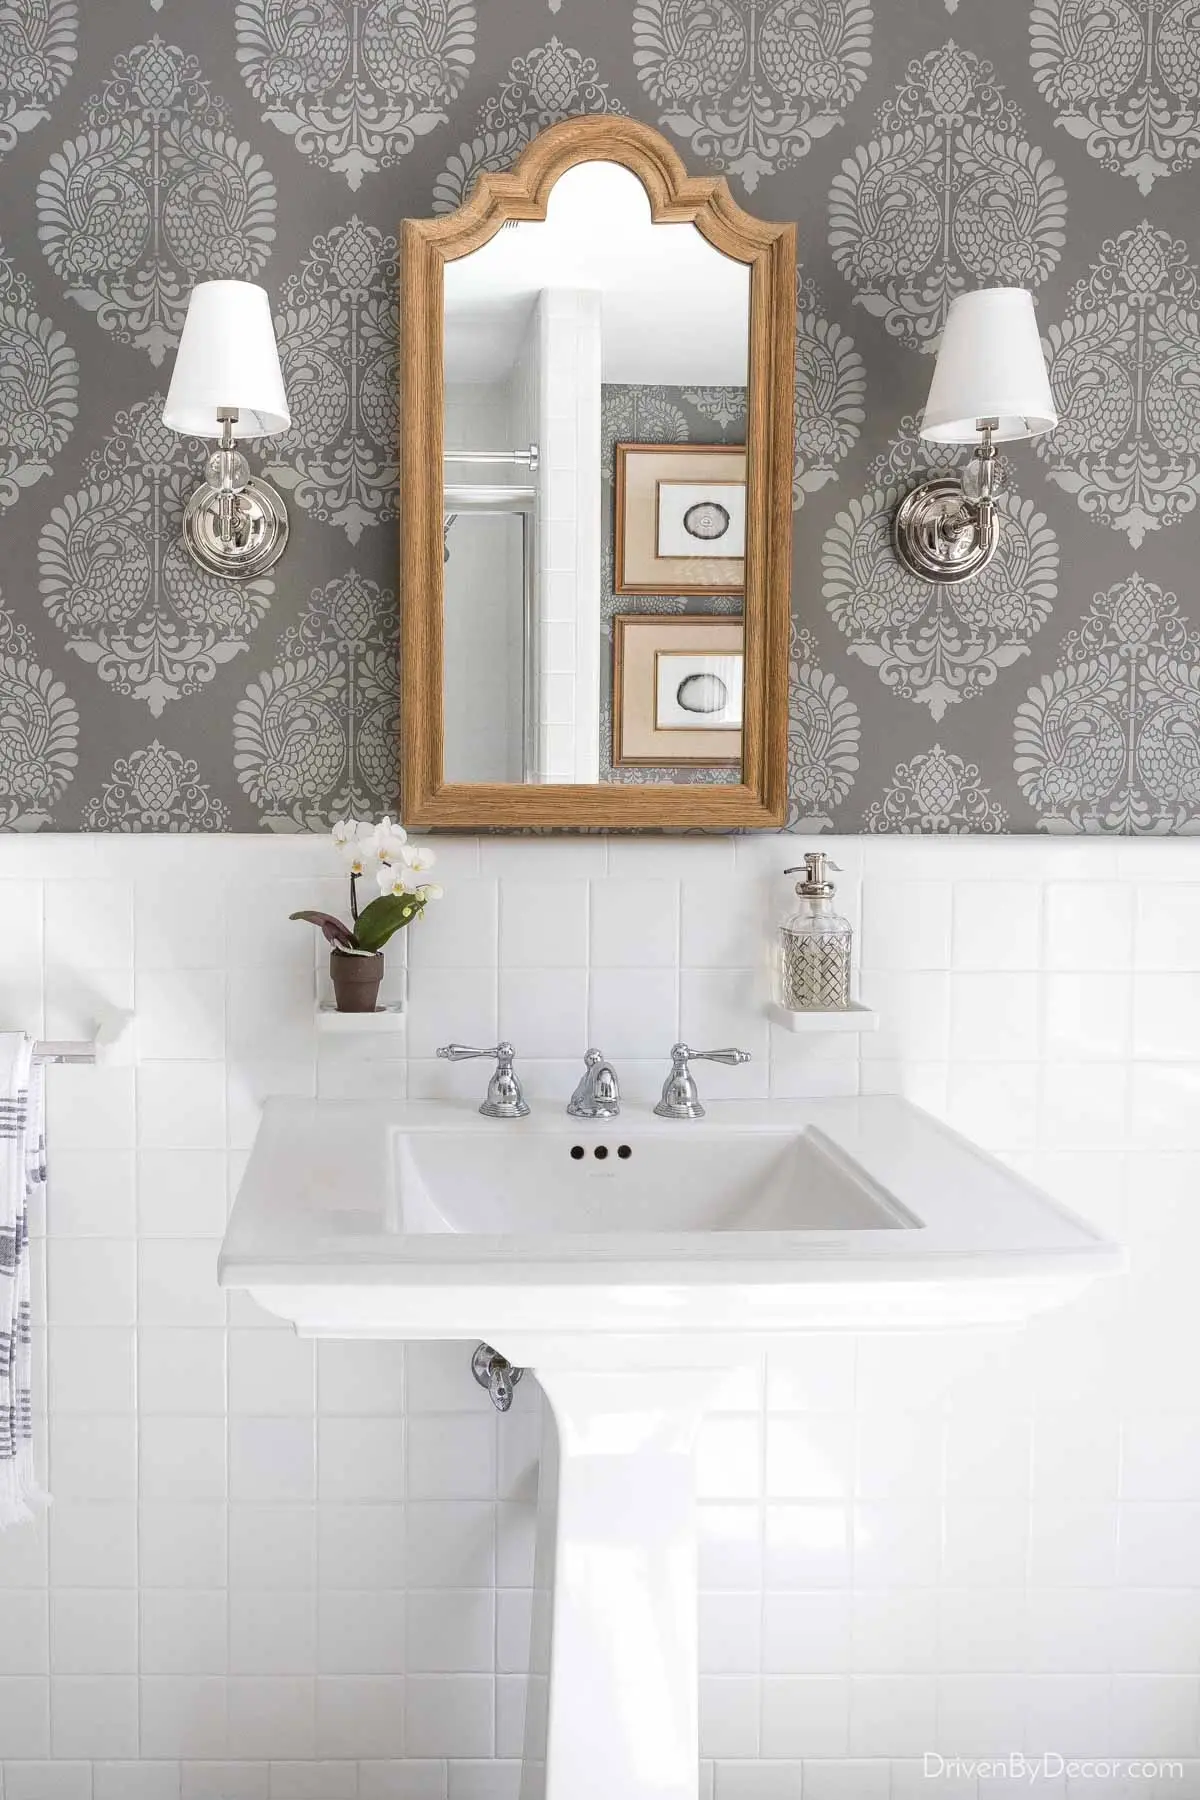
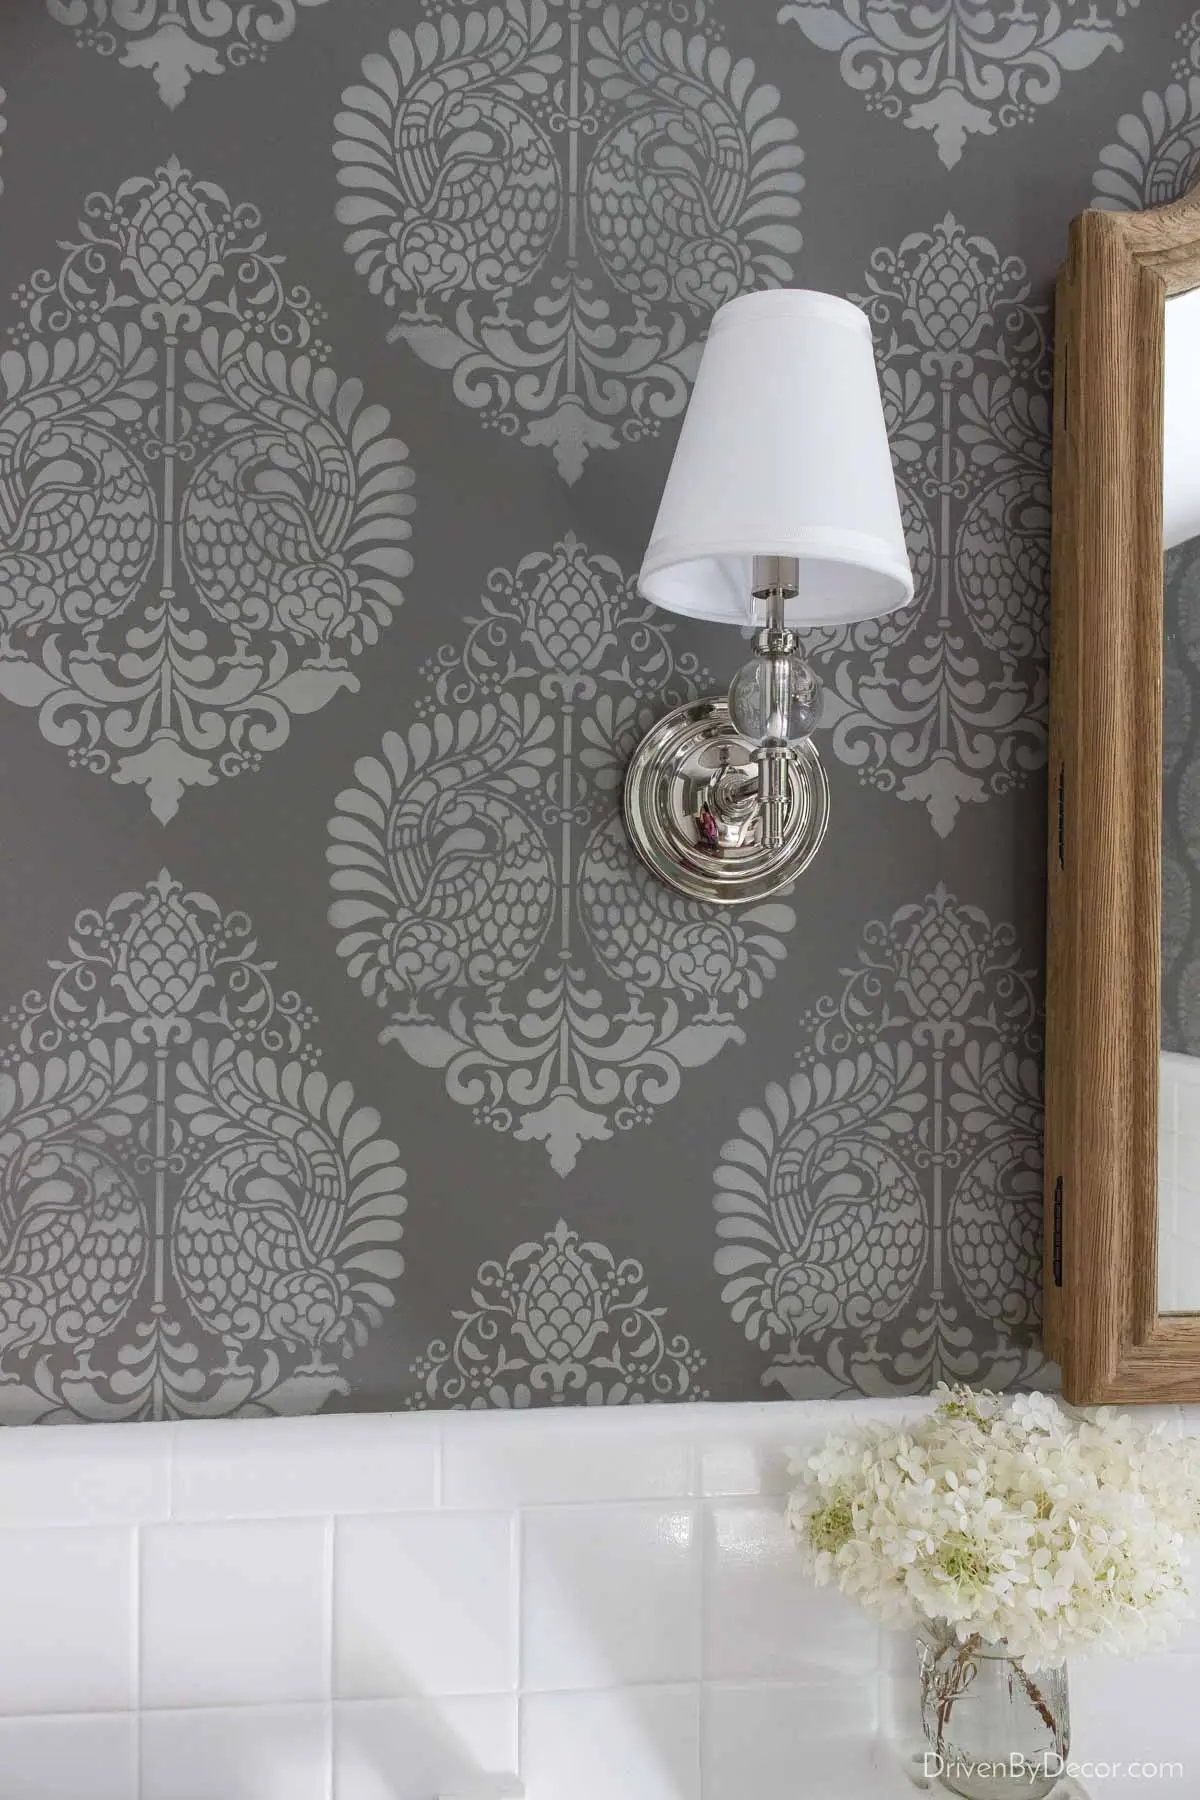
Quand beaucoup de gens pensent aux pochoirs muraux, des visions de bordures florales datées dessinées au pochoir autour de la cuisine de votre grand-mère viennent à l'esprit. Mais il existe maintenant tellement de magnifiques modèles de pochoirs qui peuvent vous donner un look haut de gamme ! Cela fait plusieurs années que j'ai peint au pochoir les murs de notre salle d'eau pour la rénovation de notre salle de bain économique et j'aime toujours le résultat. C'est certainement l'un de mes projets de bricolage préférés !
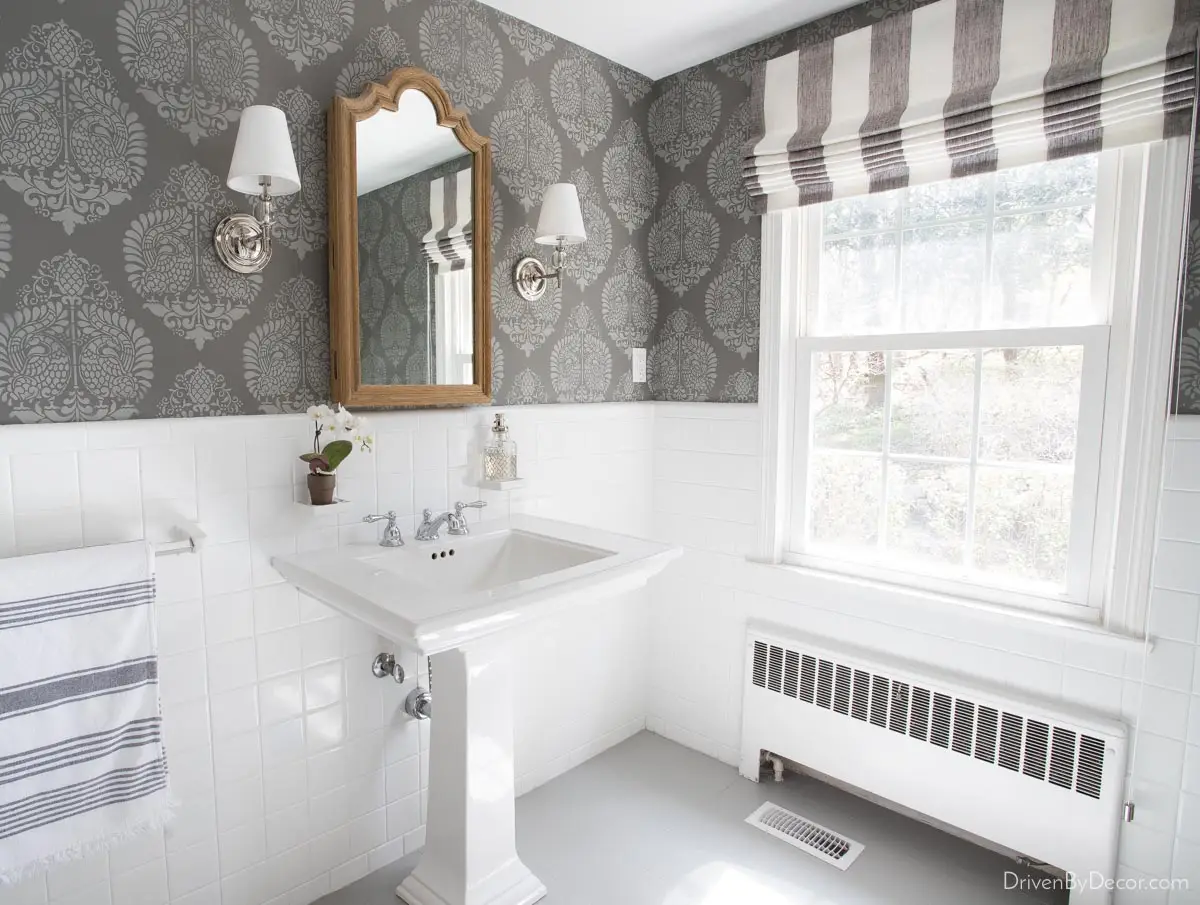
Sources de la salle d'eau : Pochoir mural damassé (11,25'' x 15,5'')ce sont :
- Cutting Edge Pochoirs {ici} – ils sont le magasin de pochoirs n°1 sur Etsy et proposent de tout, des pochoirs mandala aux pochoirs de ferme, en passant par les pochoirs damassés, les pochoirs nautiques et autres pochoirs. beaucoup plus de modèles de pochoirs muraux. J'aime particulièrement {ce pochoir de palmiers venteux} :
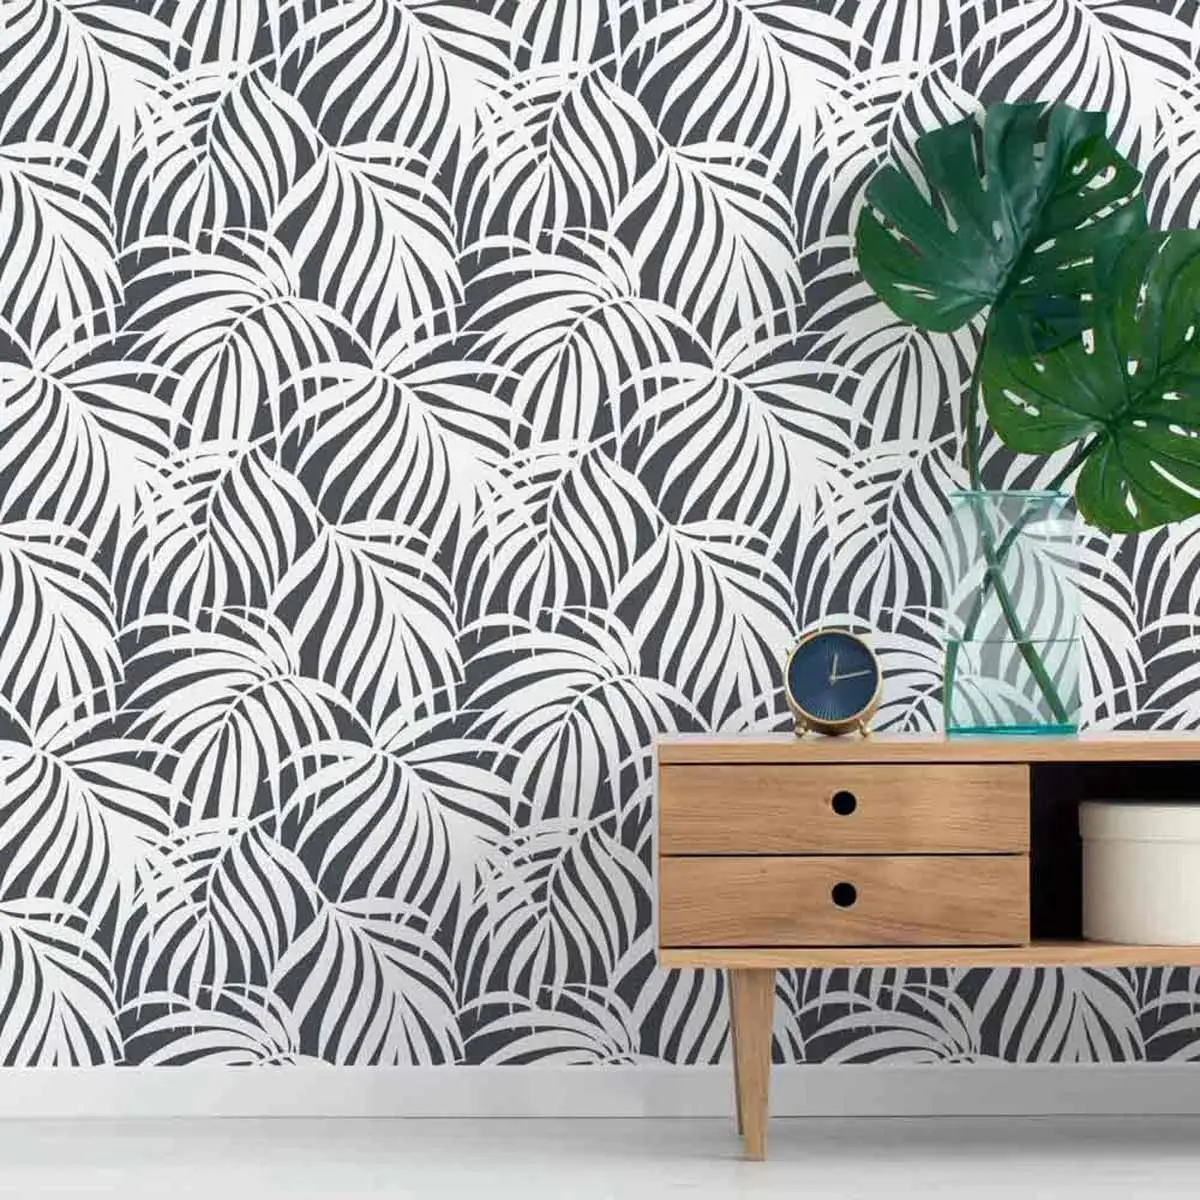
- Stencil Revolution {ici} qui contient plus de 1 500 modèles de pochoirs. L'un de mes préférés est {ce pochoir mural à motif de fougère}.
- Royal Design Studio {ici} qui propose plusieurs pochoirs à couper le souffle, dont {ce pochoir damassé indien Annapakshi} (taille 11,25'' x 15,5''h ) que j'ai utilisé dans notre salle de bain. Bien qu'il soit répertorié comme pochoir pour meubles, il s'agit du même type de pochoir que leurs pochoirs muraux, il fonctionne donc également à merveille sur les murs.
2. Rassemblez vos fournitures
En plus de votre pochoir mural, vous aurez besoin de quelques fournitures supplémentaires, notamment :
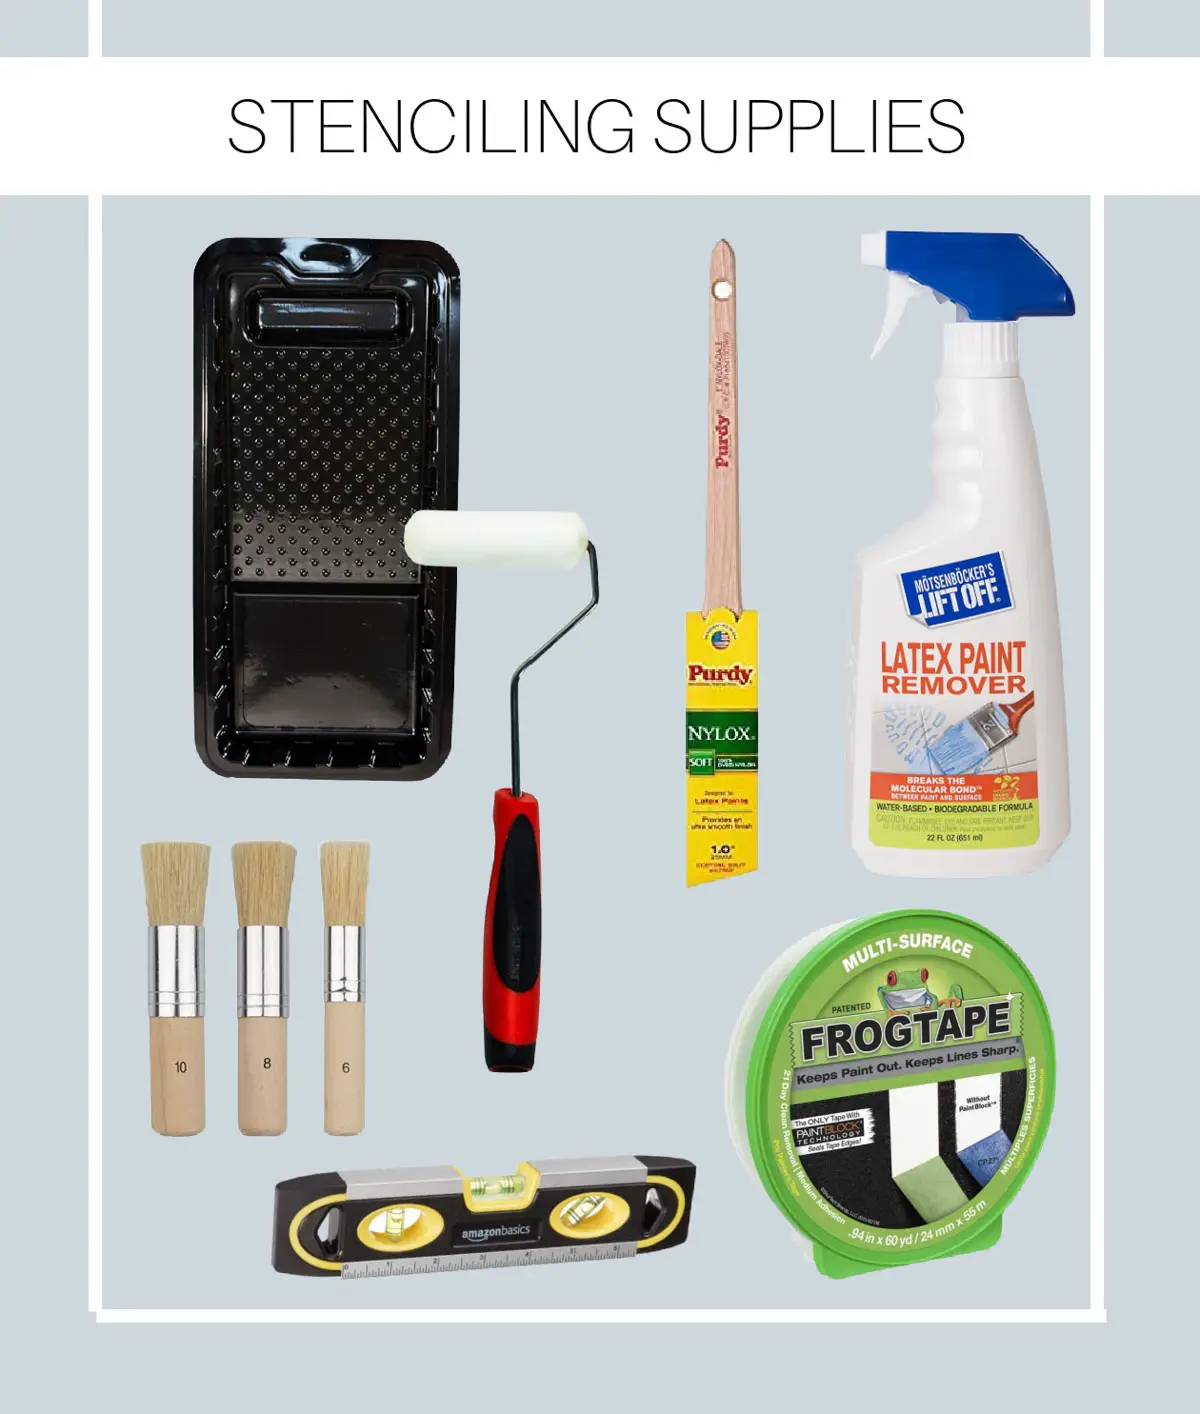
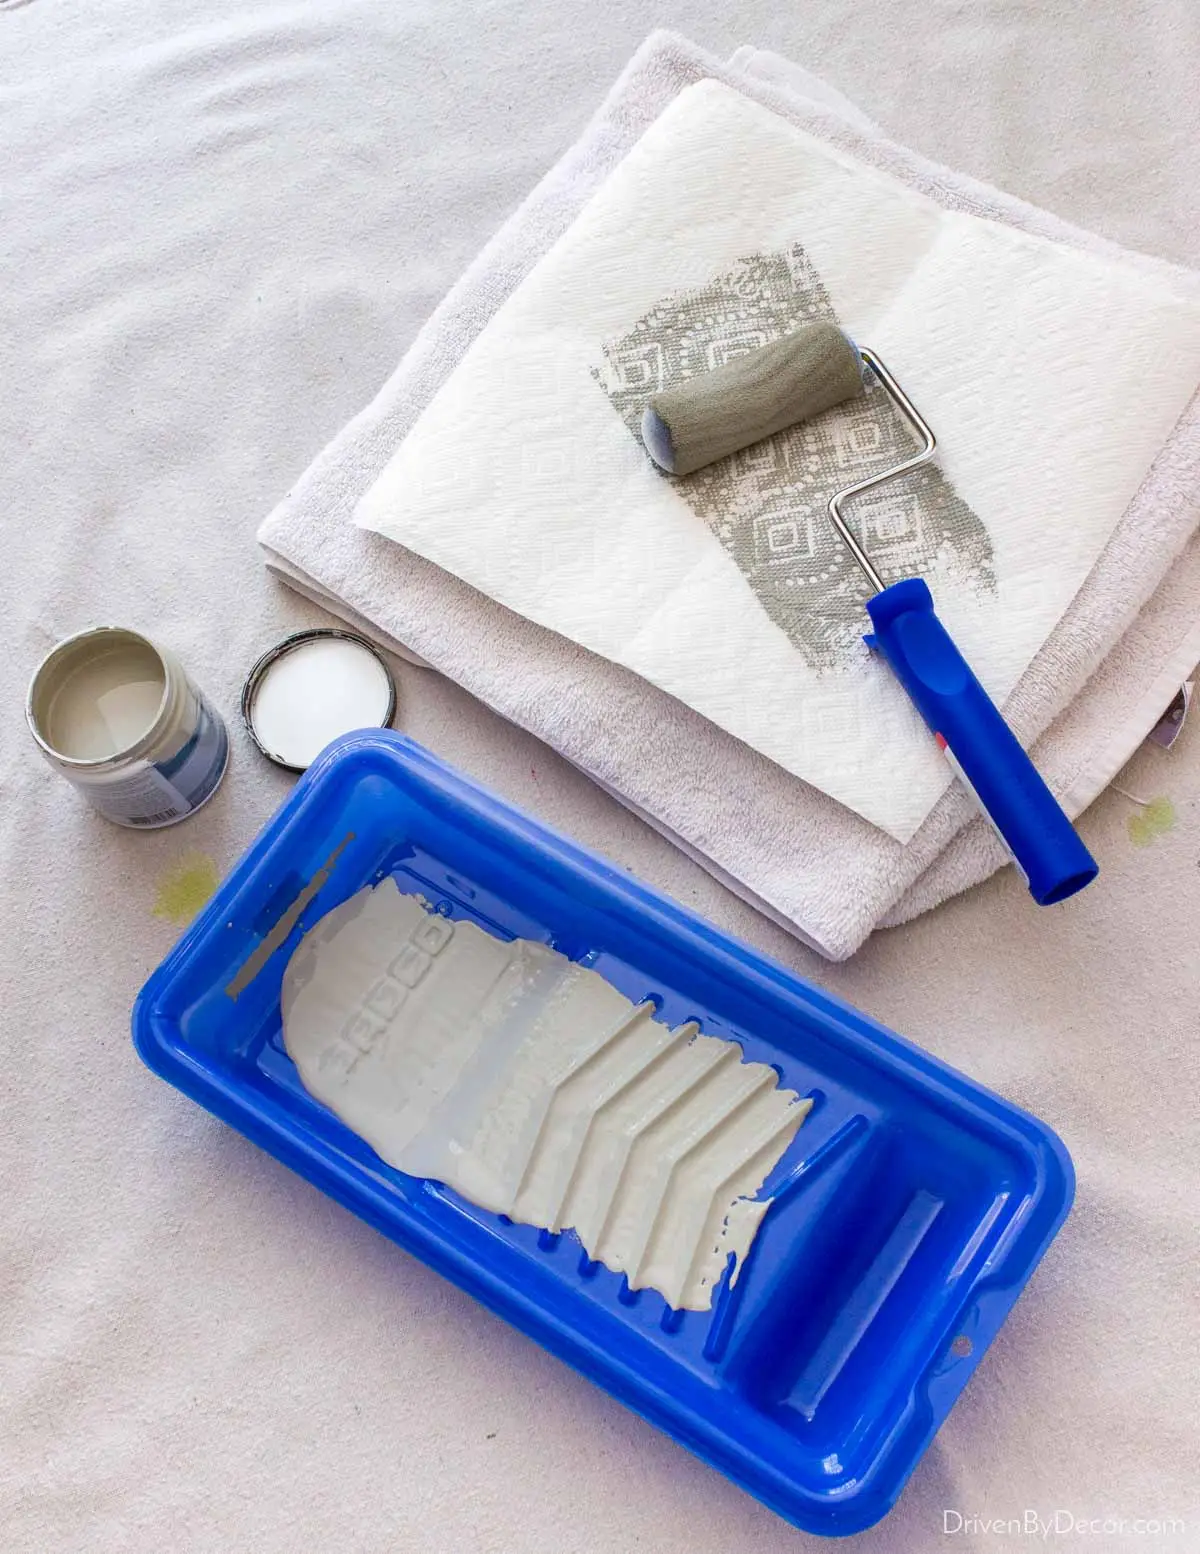
- Rouleau en mousse de 4'' avec manche + bac à rouleau à peinture 4''
- Pinceau Purdy coudé 1'' pour pochoir les coins et les bords. Vous pouvez utiliser des pinceaux à pochoir comme {ces pinceaux} à la place, mais j'ai eu plus de chance avec le pinceau angulaire traditionnel. Vous voudrez peut-être expérimenter les deux pour voir ce qui fonctionne le mieux pour vous.
- Décapant pour peinture au latex – c'est un incontournable pour nettoyer votre pochoir (cela le rend TELLEMENT plus facile). Vous pouvez également l'utiliser pour nettoyer votre pinceau et votre rouleau.
- Ruban de peintre
- Peinture au latex – choisissez une couleur de peinture pour peindre le mur sur lequel vous dessinez au pochoir et une deuxième couleur à utiliser avec le pochoir
- Carton mousse, serviettes en papier et amp; un petit niveau
3. Entraînez-vous à utiliser un pochoir mural
Si vous n'avez jamais réalisé de pochoir auparavant, je vous recommande fortement de vous entraîner sur un panneau de mousse. Peignez le panneau de mousse avec la couleur du mur de fond que vous prévoyez d'utiliser, puis expérimentez avec vos pochoirs muraux. Cela vous aidera à affiner votre technique de pochoir et également à tester différentes combinaisons de couleurs de peinture possibles. Mes premières tentatives de pochoir étaient loin d'être jolies (vous voyez ce coin inférieur ? ouais !) :
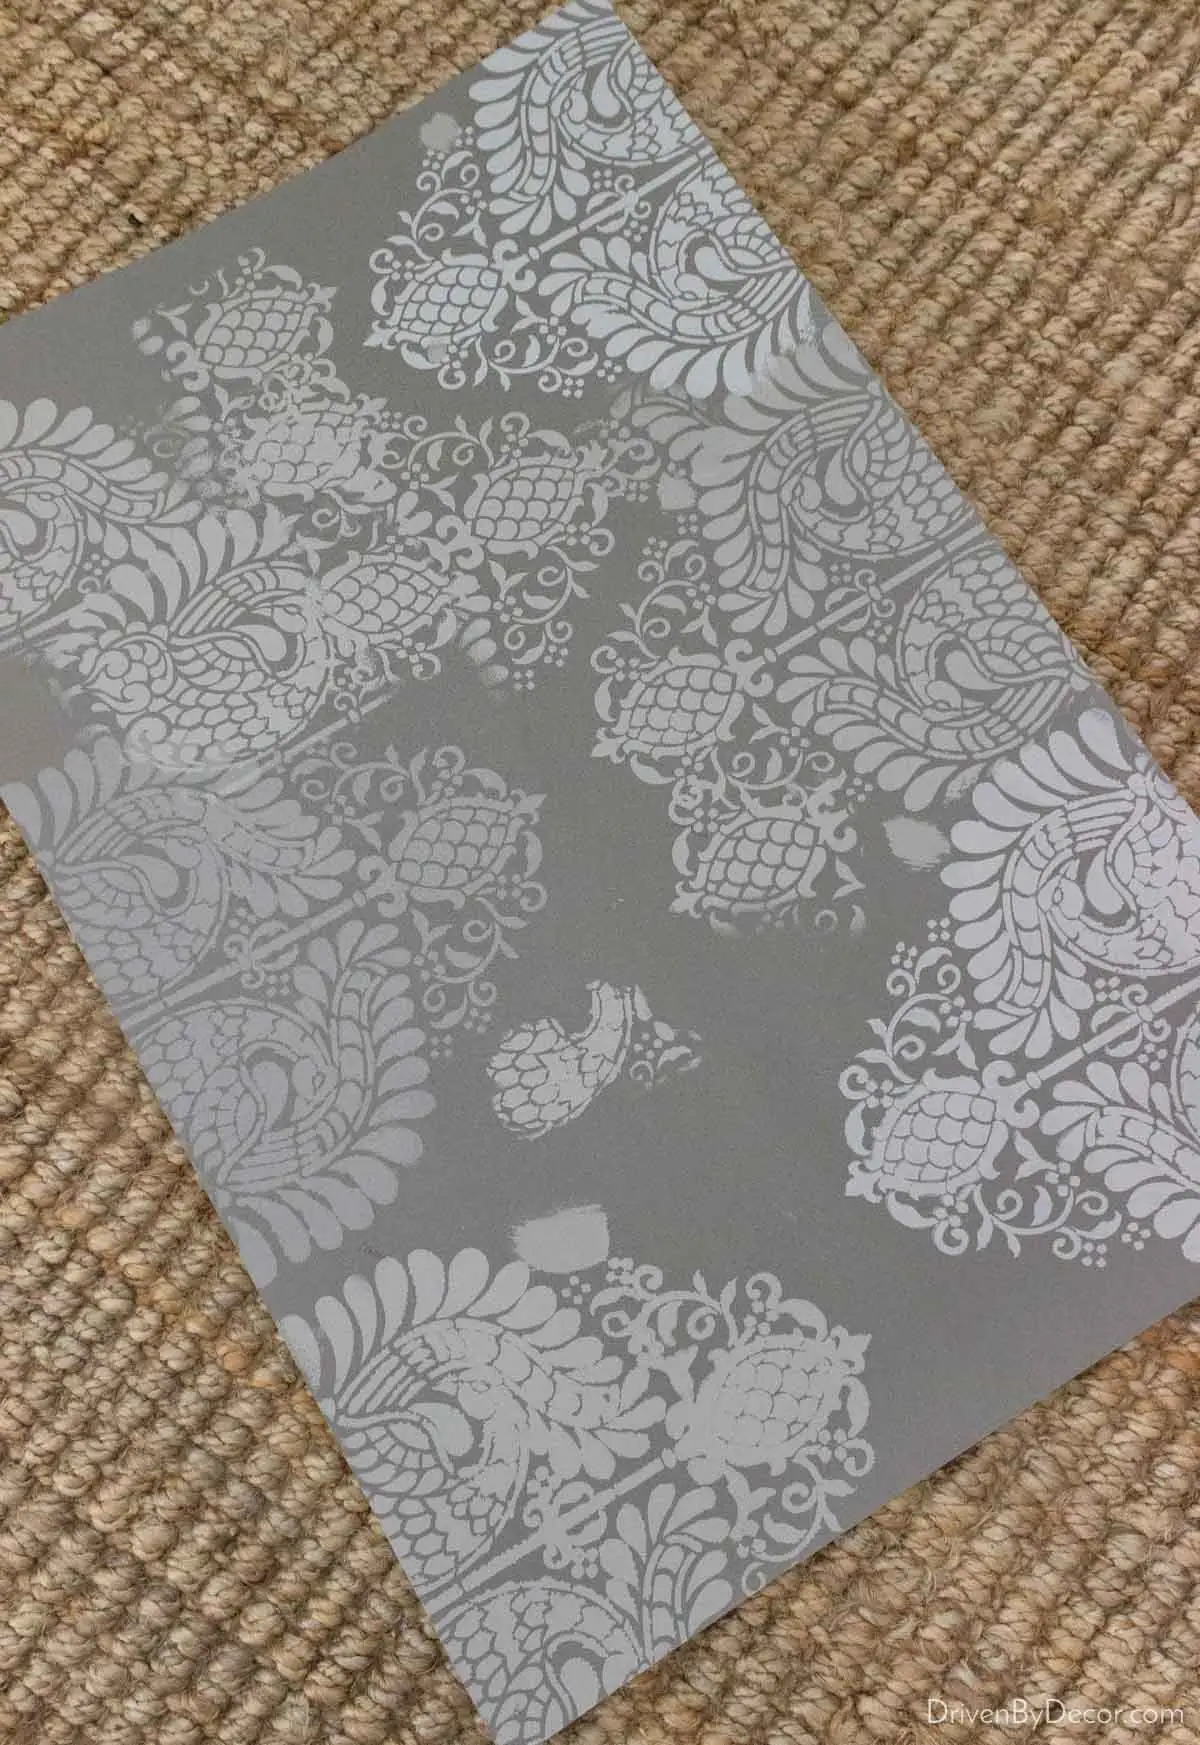
mais après plusieurs tours d'entraînement, j'ai compris et j'étais prêt à poser mon pratique à utiliser sur les murs de notre salle de bain.
Mon plus grand conseil est d'utiliser TRÈS peu de peinture ! Ce qui a le mieux fonctionné pour moi a été de décharger autant de peinture que possible dans le bac à rouleaux, puis de la rouler plusieurs fois sur une pile de serviettes en papier pliée afin qu'il ne reste qu'une petite quantité de peinture sur le rouleau.
Ensuite, appliquez une légère pression avec votre rouleau sur l'ensemble de votre pochoir – vous devrez faire des allers-retours dessus plusieurs fois pour obtenir une bonne répartition uniforme de la peinture.
4. Déterminez le meilleur endroit sur votre mur pour commencer
Une fois que vous maîtrisez votre technique, vous êtes prêt à l'essayer sur vos murs. Mon conseil ici est de réfléchir à l'endroit où vousvous voulez commencer (vous voudrez peut-être centrer votre motif sur le mur) plutôt que de vous y lancer sans réfléchir. Si possible, vous souhaiterez peut-être commencer par le mur, là où les erreurs seront les moins visibles, car même si vous vous êtes entraîné, votre technique s'améliorera à mesure que vous avancerez dans le projet.
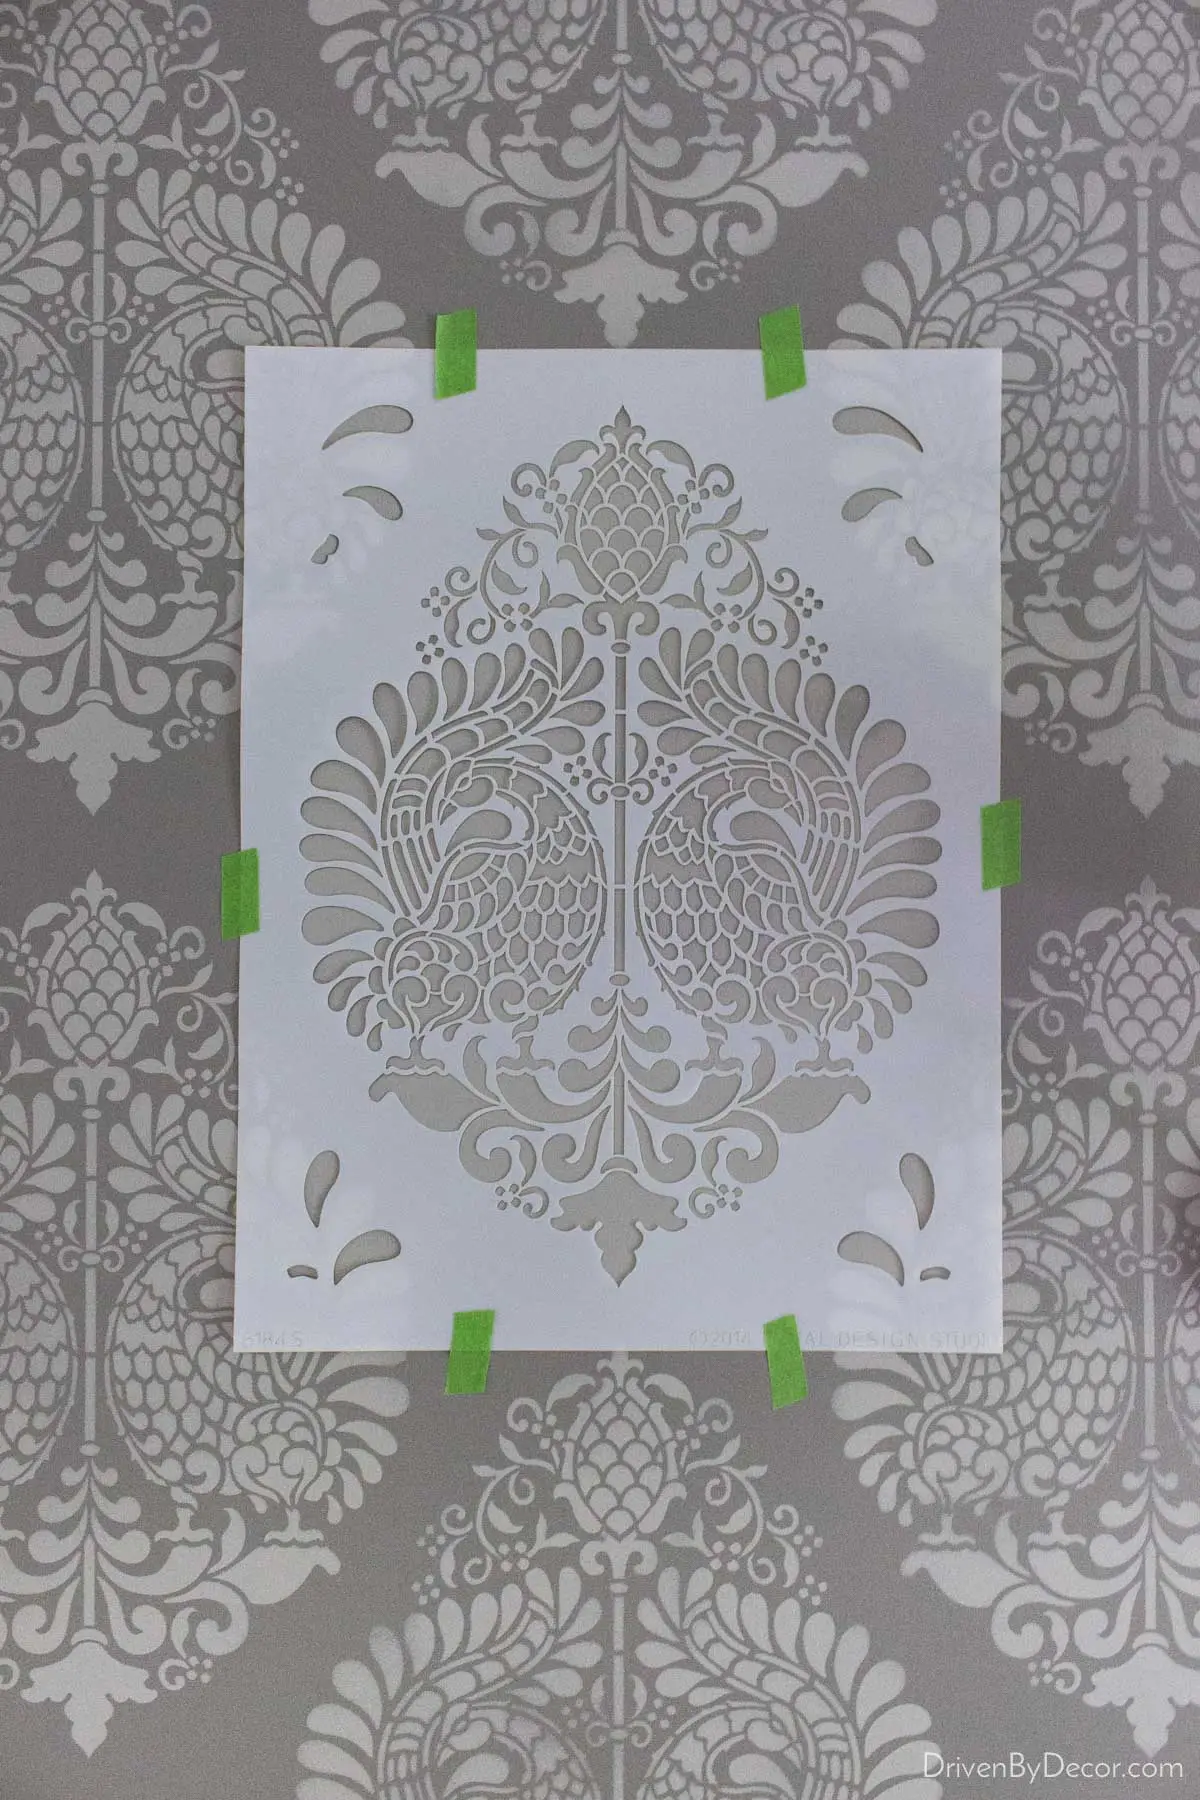
5. Niveau, bande et amp; Roulez votre pochoir
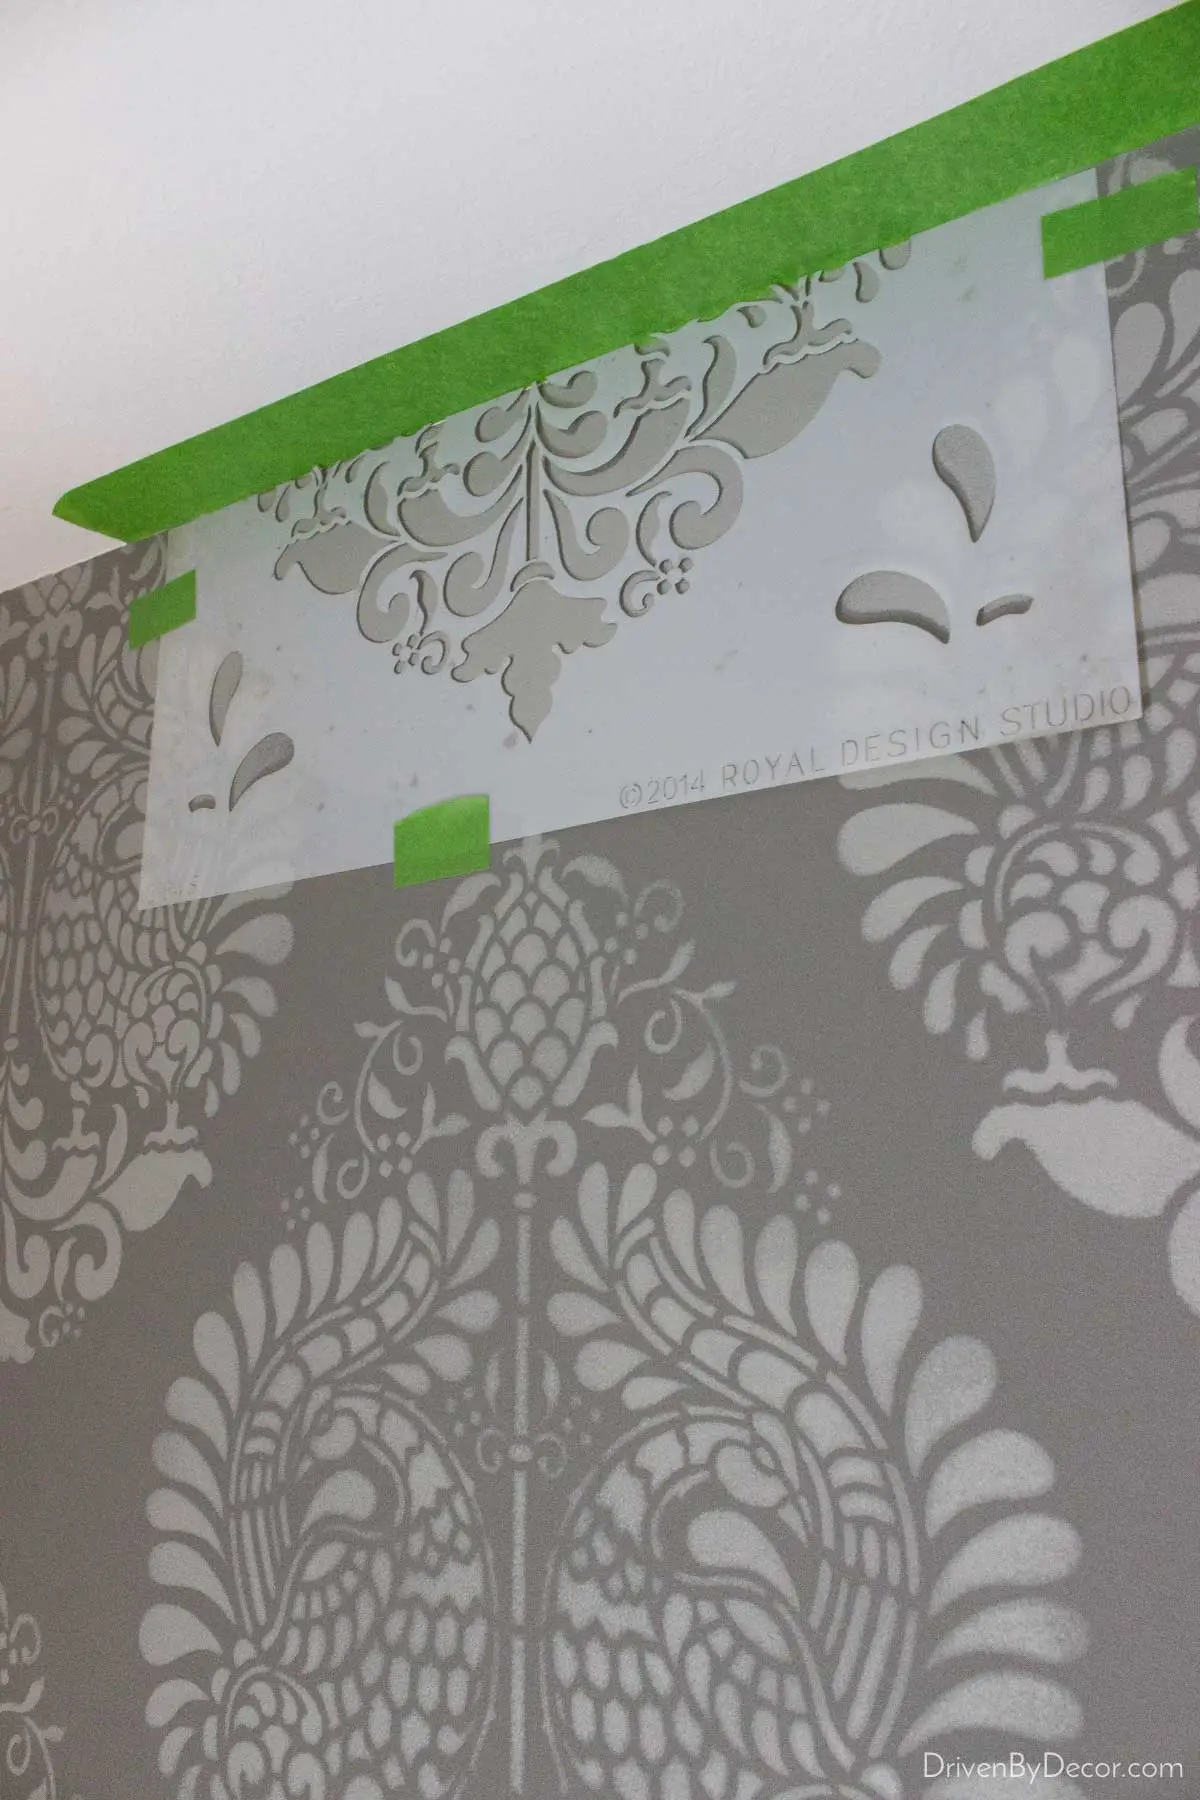
Une fois que vous avez décidé où placer votre pochoir, utilisez du ruban adhésif pour peintre pour coller les quatre coins vers le bas et maintenez un niveau sur le côté du pochoir mural pour vous assurer qu'il est droit. Je n'ai pas utilisé le niveau à chaque fois que je plaçais le pochoir, mais je l'ai utilisé de temps en temps tout au long du projet pour m'assurer de rester sur la bonne voie.
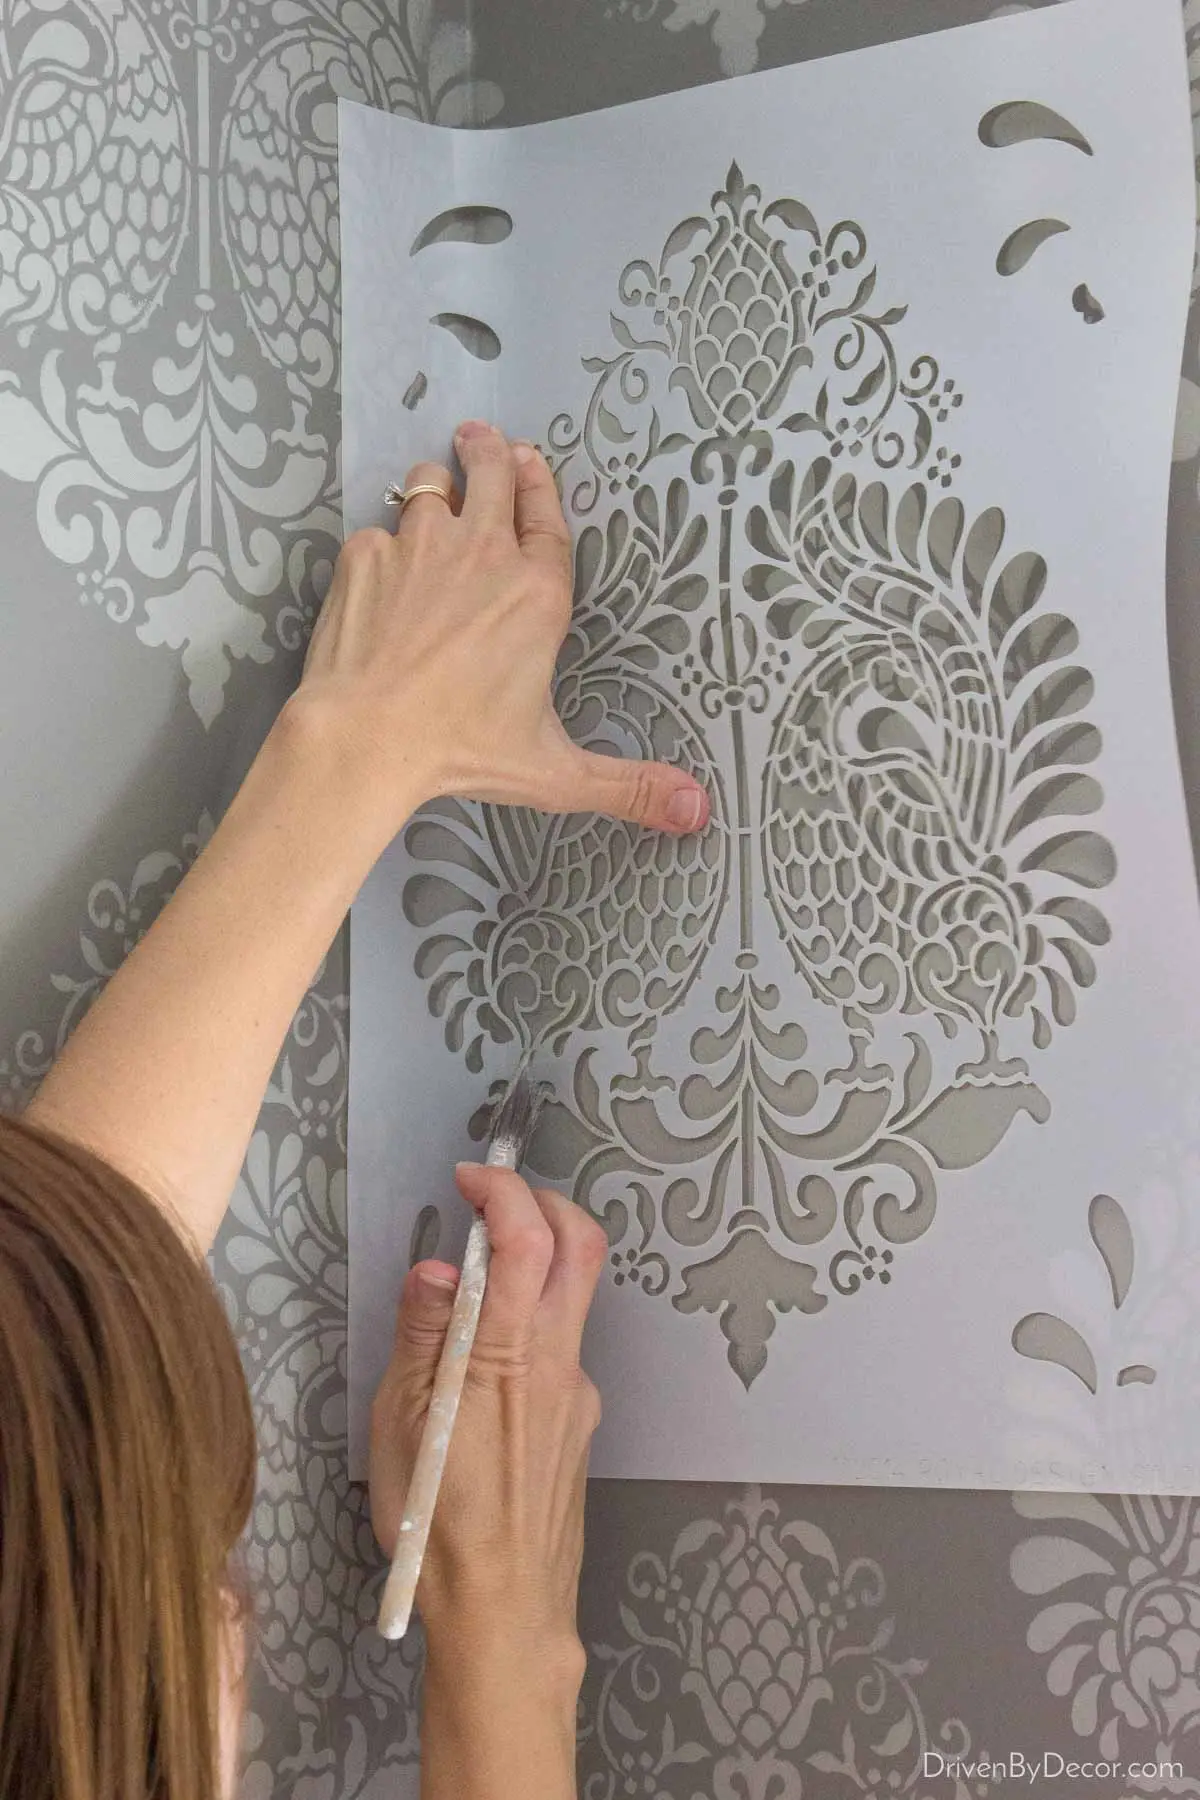
Comme en ce qui concerne le placement du pochoir, le pochoir que j'ai utilisé avait un guide intégré – il y avait des découpes dans les coins qui s'alignaient avec les zones que j'avais précédemment pochoir, garantissant que je répartissais mon pochoir uniformément. C'était très utile et c'est certainement une fonctionnalité que je rechercherais lors du choix des pochoirs muraux !
Maintenant, vous allez rouler sur le pochoir avec votre rouleau en mousse, comme vous l'avez fait lorsque vous exercé. N'oubliez pas d'utiliser seulement un peu de peinture, une légère pression et plusieurs rouleaux d'avant en arrière.
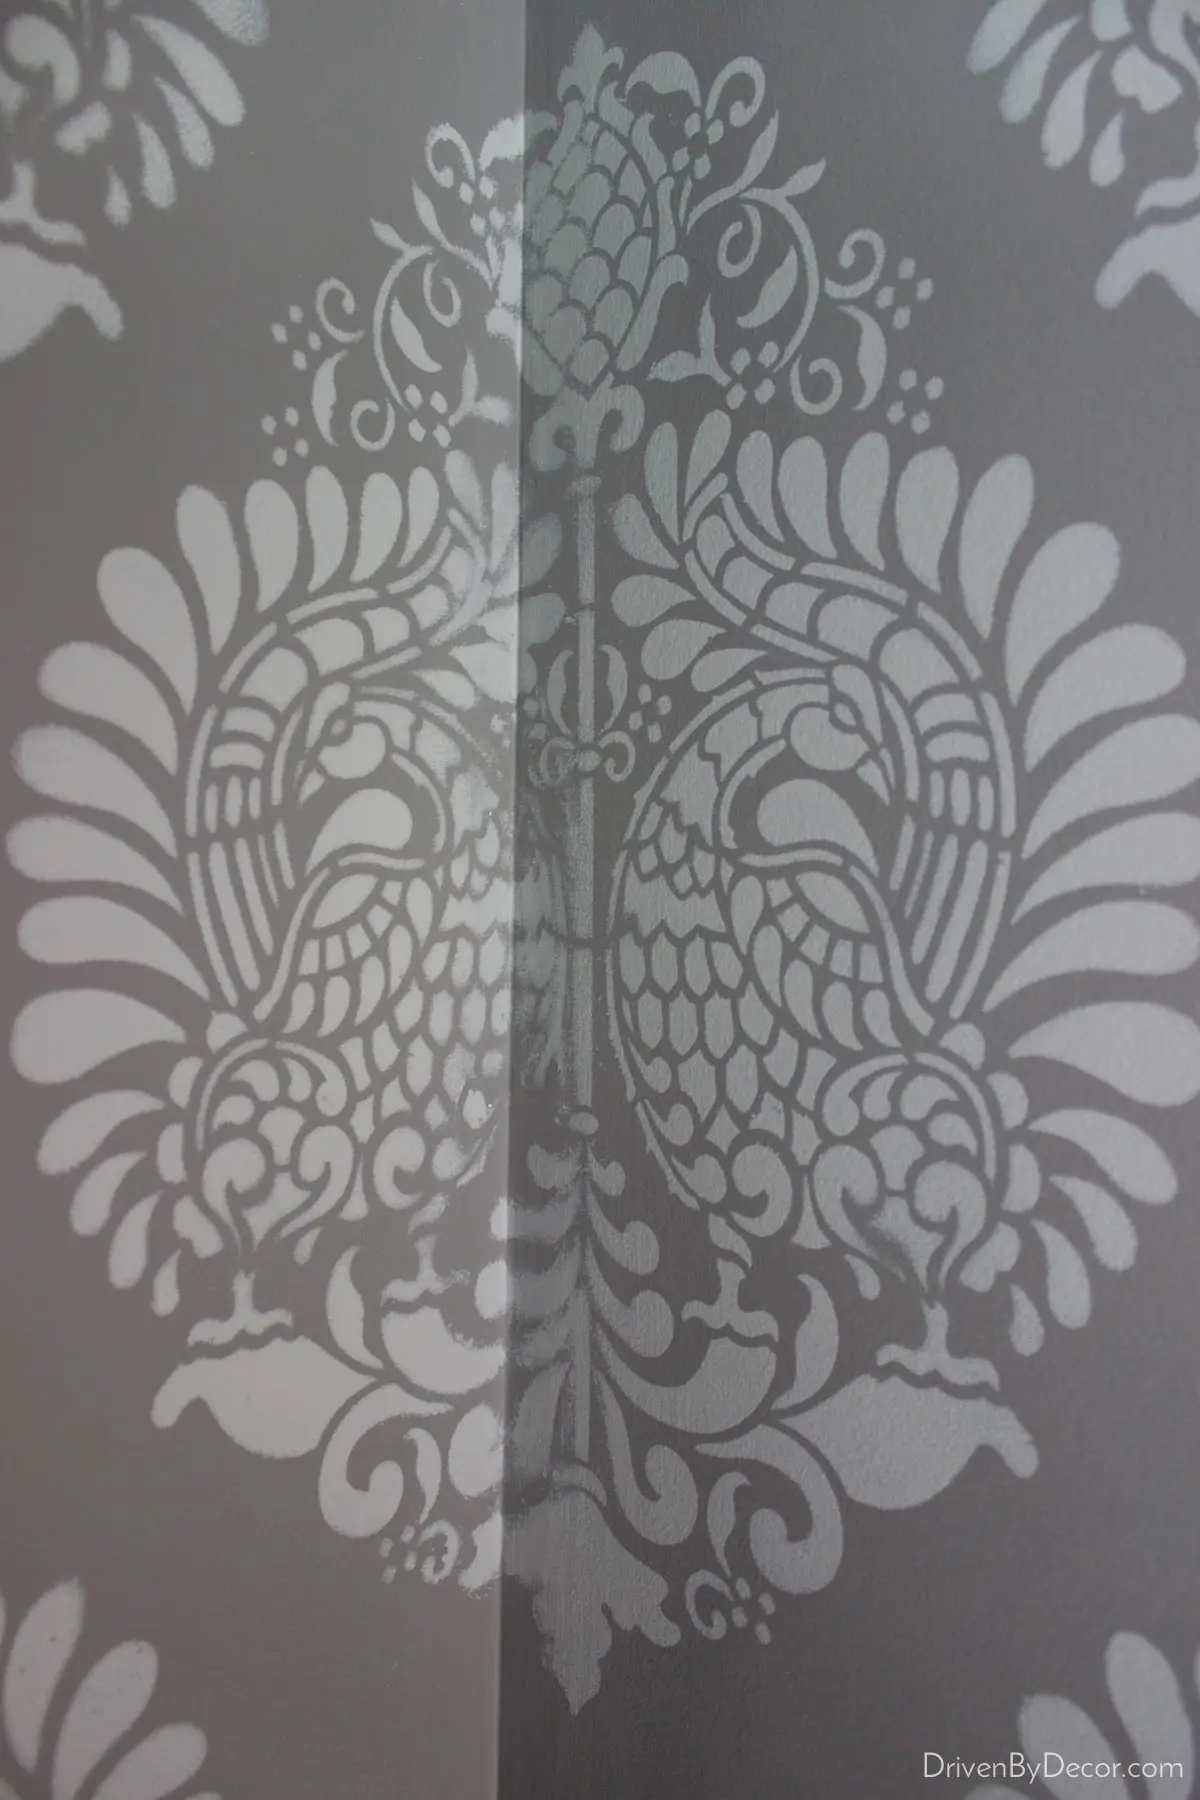
Et les coins ? Ce sont des idiots délicats ! La clé est de pochoir un seul côté du coin à la fois. Coincez le pochoir aussi fermement dans le coin et contre lemur autant que possible (ne vous inquiétez pas de garder tout le pochoir à plat – souciez-vous simplement de la zone sur laquelle vous dessinez au pochoir) et utilisez un pinceau avec très peu de peinture dans un mouvement de tamponnage droit de haut en bas.
Une fois J'ai pochoir un côté du coin, je passais généralement au pochoir une autre zone du mur pour laisser ce coin sécher quelques minutes, puis je revenais pour faire l'autre côté du coin en utilisant la même technique. Cela aide vraiment d'avoir deux personnes pour faire les coins (une personne tenant le pochoir dans le coin avec les deux mains et l'autre personne dessinant au pochoir) mais c'est également faisable avec une seule personne (j'ai fait tous les coins sauf un par moi-même).
J'ai fait quelque chose d'un peu différent lorsque mon pochoir a touché le plafond et le carrelage de mon mur. En fait, j'ai attendu pour faire ces zones jusqu'à ce que j'aie fini de faire tous mes autres pochoirs, puis j'ai coupé mon pochoir (j'ai utilisé un étalon pour tracer une ligne droite dessus, puis je l'ai simplement coupé avec des ciseaux). J'ai posé une ligne de ruban adhésif pour peintres au plafond, j'ai scotché le pochoir comme d'habitude et j'ai utilisé une combinaison de mon rouleau à pochoir et de mon pinceau. Tellement plus facile que d'essayer de travailler avec un pochoir complet !
Sachez simplement que même si vous pochoirez uniformément, souvent les murs ne sont pas complètement uniformes, donc certaines zones proches du plafond que vous avez laissées au pochoir peut être plus grand que d’autres – commencez par les zones les plus grandes et descendez jusqu’àle plus petit. De cette façon, vous pouvez continuer à couper votre pochoir mural de plus en plus petit pour l'adapter à l'espace.
Si vous ne souhaitez pas couper votre pochoir, vous pouvez simplement le plier comme vous l'avez fait dans les coins.
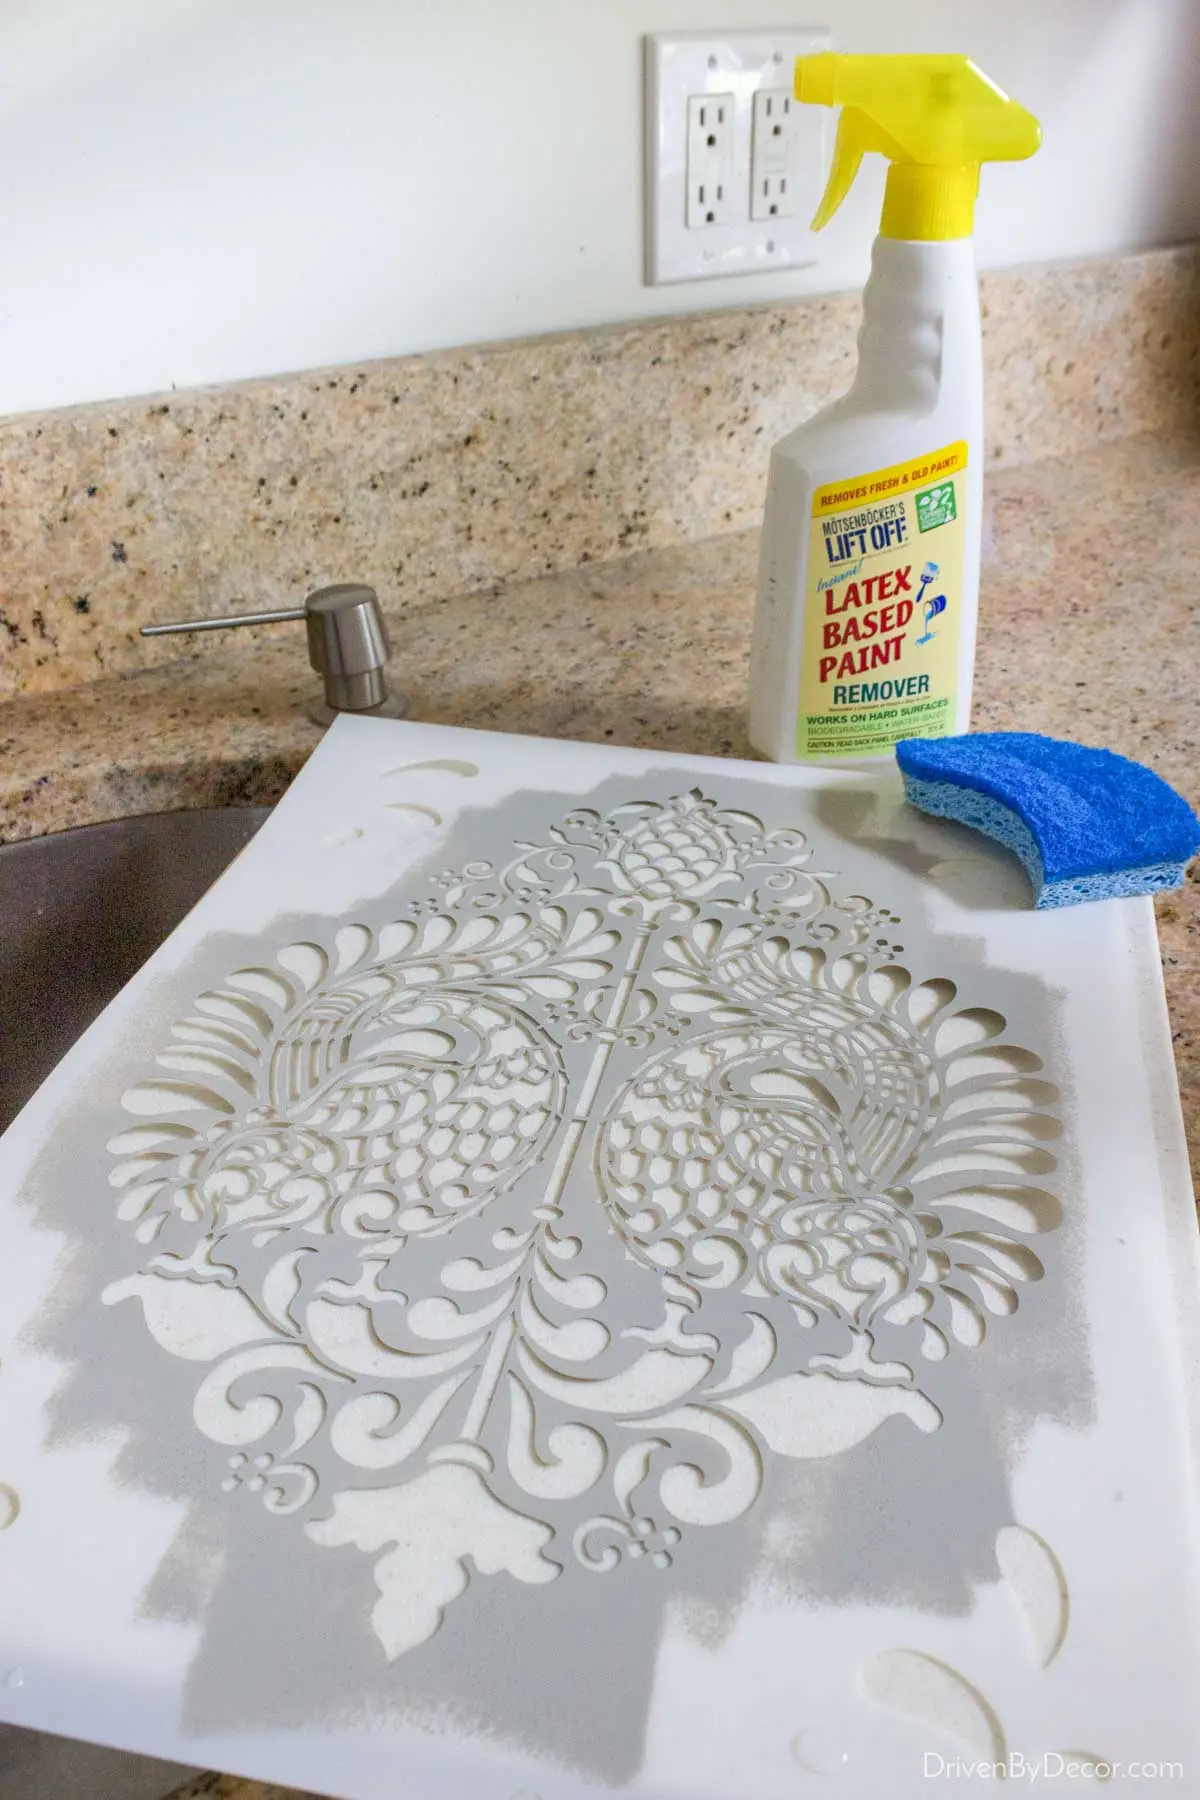
J'ai un autre conseil à partager, tiré de quelque chose que j'ai compris alors que j'étais bien avancé dans mon projet de pochoir. Je constatais que mon pochoir devenait de plus en plus inégal et que cela était dû à une accumulation de peinture sur mon pochoir. Pour lutter contre cela, chaque fois que je roulais ou brossais mon pochoir, je posais le pochoir sur une vieille planche à découper et j'utilisais une serviette en papier humide pour essuyer autant de peinture que possible avant de continuer mon pochoir. Même en faisant cela, suffisamment de peinture finirait par s'accumuler pour que je doive nettoyer complètement mon pochoir pour obtenir de belles lignes nettes et une répartition uniforme de la peinture.
Au départ, j'ai essayé de nettoyer mon pochoir mural avec de l'eau et du savon, mais la peinture est DIFFICILE à enlever et cela a pris une éternité ! J'ai finalement essayé d'utiliser {ce décapant au latex en aérosol} et cela a fonctionné à merveille ! J'ai simplement posé le pochoir sur mon ancienne planche à découper, je l'ai vaporisé, je l'ai laissé reposer pendant quelques minutes, puis j'ai lavé la peinture.
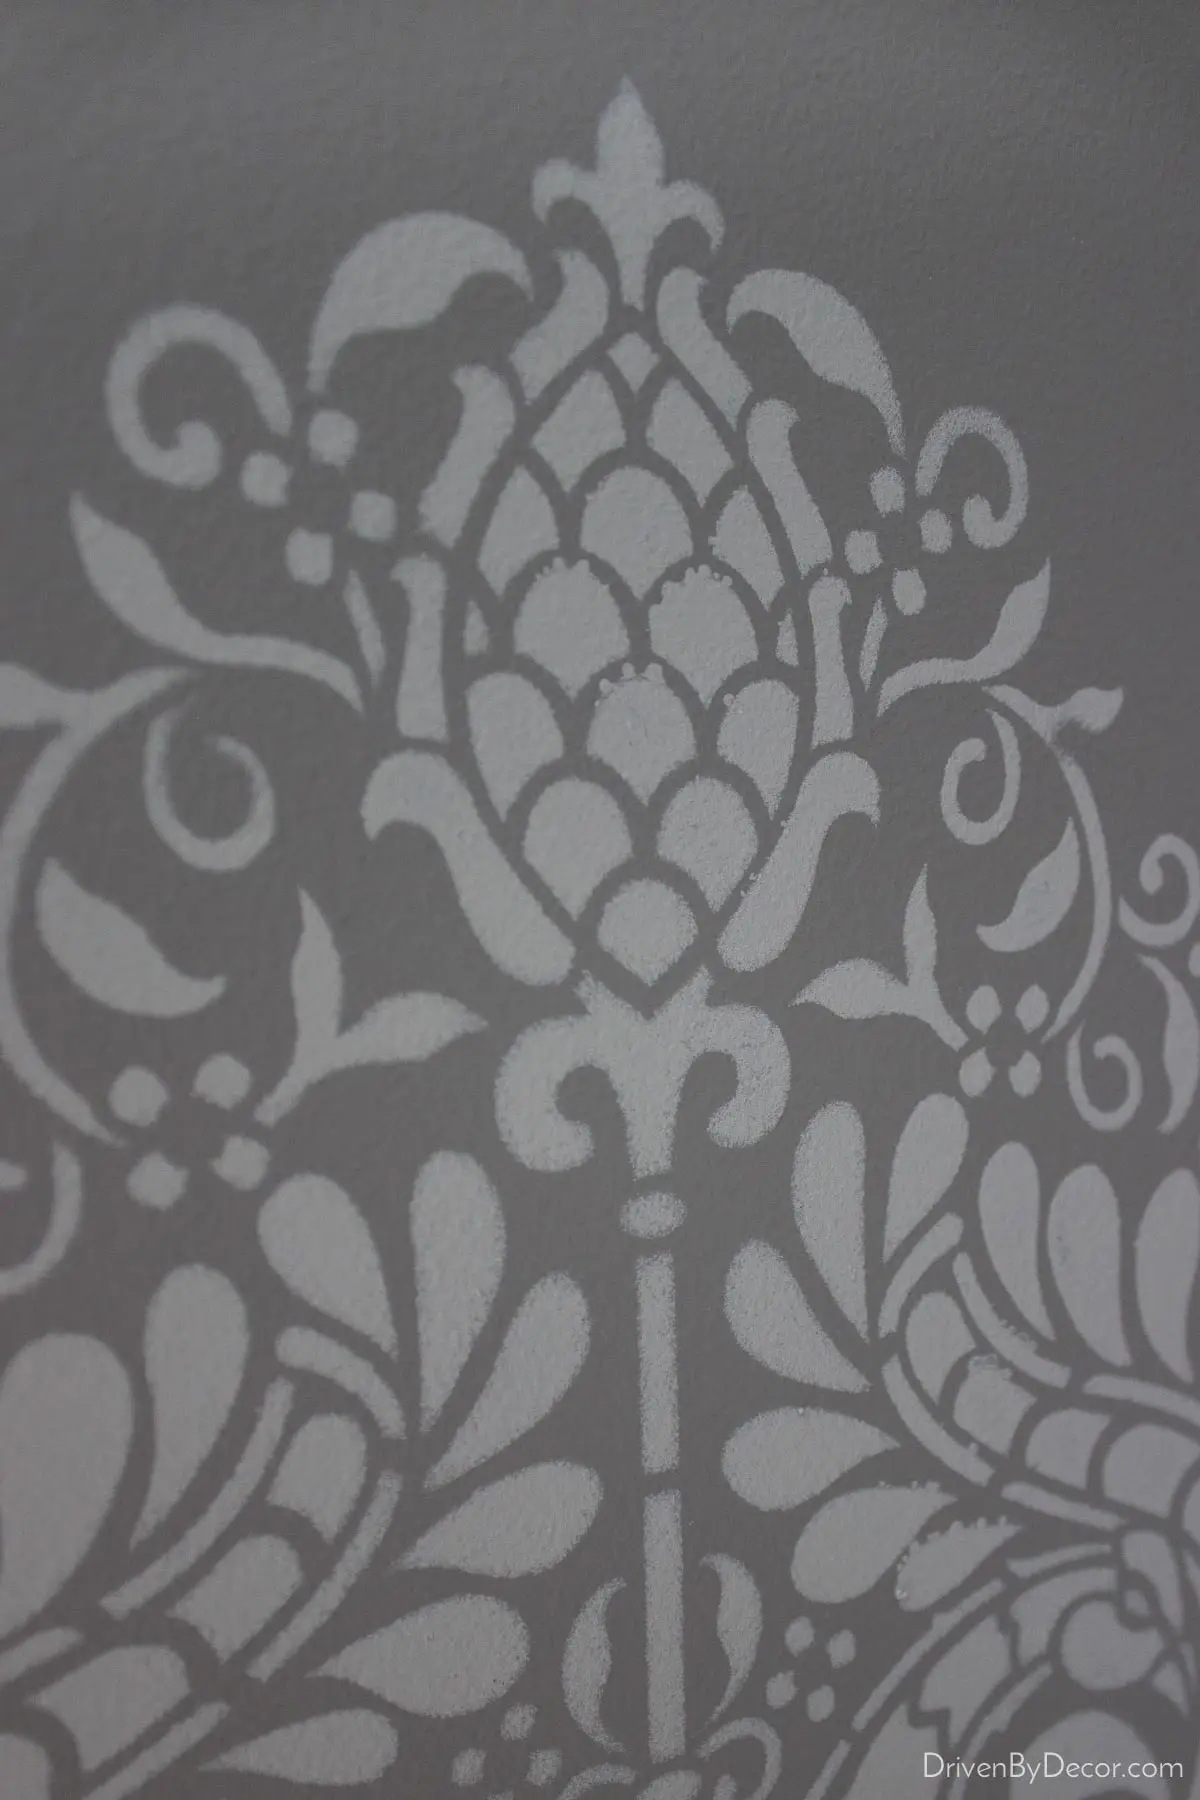
Mon dernier conseil est de ne pas souciez-vous de le rendre parfait ! Toutes les personnes qui ont vu notre salle de bain (et qui ne lisent pas mon blog :)) pensent que c'est du papier peint car lorsque tout l'espace est terminé, on ne remarque pas toutes ces petites imperfections :
Mais croyez-moi, ils sont là ! Mes coins sont loin d'être parfaits :
et il y a plusieurs endroits où ma peinture a coulé à travers le pochoir (d'ailleurs, si vous les voyez au moment où ils se produisent, vous Vous pouvez utiliser un cure-dent humide pour les essuyer !).
Pendant que je dessinais au pochoir, je pensais que je reviendrais et retoucherais tous ces endroits à la fin, mais en vérité, vous ne les remarquez tout simplement pas lorsque vous regardez la pièce dans son ensemble, alors je les ai laissés tranquilles !
Et maintenant, passons aux questions que vous les gars avaient pour moi...
Le pochoir est-il difficile ?
Je ne dirais pas que c'est difficile, mais comme pour tout bricolage, il y a un peu de courbe d'apprentissage, c'est pourquoi s'entraîner C est la clé. Le pochoir prend beaucoup de temps – il faut beaucoup plus de temps pour peindre un mur au pochoir que pour le tapisser ou le peindre. Pour votre premier projet de pochoir, je vous recommande de commencer petit avec un mur d'accent, l'arrière d'une bibliothèque ou une petite salle de bain au lieu de vous lancer dans le pochoir d'une pièce entière.
Avez-vous besoin d'une peinture spéciale pour le pochoir mural ?
Non ! Vous pouvez utiliser la même peinture que celle que vous utilisez pour peindre les murs avec des pochoirs muraux. C’est l’un des avantages du pochoir mural par rapport au papier peint : vous pouvez choisir les nuances exactes que vous souhaitez pour votre espace afin qu’il se coordonne parfaitement avec votre décor ! Puisque vous n’avez pas besoin de beaucoup de peinture pour le pochoir, un litre de peinture devrait suffire, ce qui signifieque vous pouvez utiliser au pochoir pour une fraction du coût du papier peint.
Quelles sont les autres options pour décorer les murs ?
Une option consiste à utiliser du papier peint à décoller et à coller : vous obtenez un aspect similaire à celui d'un papier peint ordinaire. papier peint mais il est plus facile à installer et plus adapté aux débutants. Consultez mon article sur l’installation du papier peint à décoller et coller pour plus de détails. Une autre option (et la plus rapide et la plus simple de toutes) consiste à utiliser des autocollants muraux. Ce sont essentiellement des autocollants et ils sont faciles à mettre et à enlever. Consultez mon article sur les autocollants muraux en vinyle dans notre buanderie pour tous les détails.
J'espère que cela vous a été utile !
