8 mois de procrastination se terminent enfin
Bienvenue au 224ème lundi de la Métamorphose !
J'espère que vous avez passé un merveilleux week-end. C’était un de ces week-ends où j’avais une longue liste de choses que je voulais vraiment faire, mais Mère Nature avait d’autres projets. Il a plu « à la manière de la mousson » toute la journée de samedi, mais étant la femme déterminée et folle que je suis, j'ai traîné les grandes urnes de la terrasse sur le porche et les ai replantées comme je l'avais prévu. Ensuite, je les ai ramenés sur le pont, le tout sous une pluie battante. Oui. Je l'ai fait. J'étais déterminé à rayer au moins une chose de ma liste de choses à faire.
Avec toute cette pluie et ce temps maussade, je commence à avoir l'impression que je vivre au pays des feuilletons. Vous savez à quel point les choses semblent toujours sombres et lugubres dans les feuilletons. Ou peut-être que ma maison a été transportée comme par magie à Gotham City ! Quoi qu'il en soit, les photos de cet article sont un peu sombres, très « Gotham-like ».
J'ai vérifié les prévisions météo samedi et il est apparu que dimanche il y aurait quelques absences de pluie. heures pendant lesquelles travailler. Le soleil est effectivement apparu pendant quelques minutes et c'était magnifique. J’avais presque oublié à quoi ressemble le soleil, le temps était tellement nuageux et dégueulasse ici ces derniers temps. Il n'a pas fait beau longtemps mais au moins la pluie a résisté pendant quelques heures.
J'ai dû travailler vite aujourd'hui. Beaucoup de « rempotages » et de plantations ont été effectués ; Je partagerai ça un autre jour. Aujourd'hui, je partage quelque chose que j'ai enfinLundi :

Si vous participez à Metamorphosis Monday, vous devrez lier le « lien permanent » à votre article MM et non à l'adresse générale de votre blog. Pour obtenir votre permalien, cliquez sur le nom de votre article, puis copiez et collez simplement l'adresse qui apparaît dans la barre d'adresse en haut de votre blog, dans la case « url » pour InLinkz.
Afin de créez un lien, vous devrez inclure un lien dans votre message MM vers la fête afin que les autres participants aient la possibilité de recevoir la visite de vos merveilleux lecteurs de blog.
Veuillez respecter ces quelques règles :
Liez uniquement les publications Avant et Après qui concernent la maison, le jardinage, l'artisanat, la peinture, la couture, la cuisine ou le bricolage.
Ne créez pas de lien si vous le faites pour promouvoir un site Web ou un produit. .
Ne créez pas de lien vers une publication qui vient d'être liée la semaine dernière, car de nombreux lecteurs auront déjà vu cette publication.
Ne tapez pas TOUT EN MAJUSCULES. Il diffuse les liens partout.
Essayons quelque chose d'amusant aujourd'hui ! Veuillez rendre visite à la personne qui a créé un lien avant et après vous... de cette façon, tout le monde recevra des visites.
Bienvenue ! Merci d'être venu à la fête !
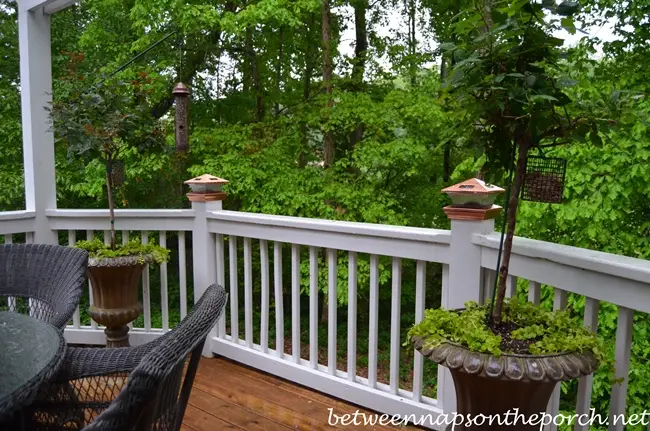
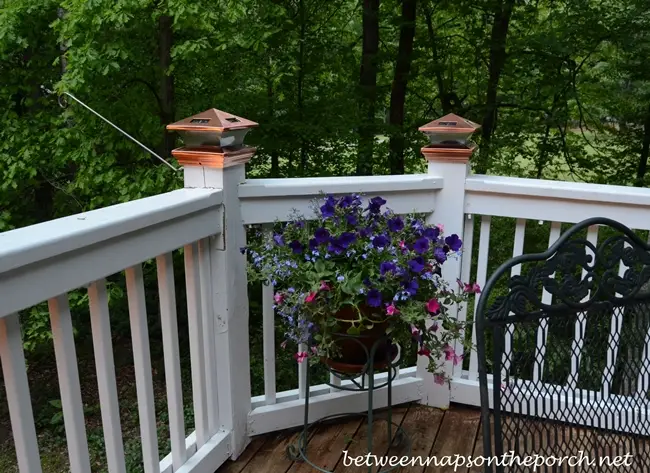
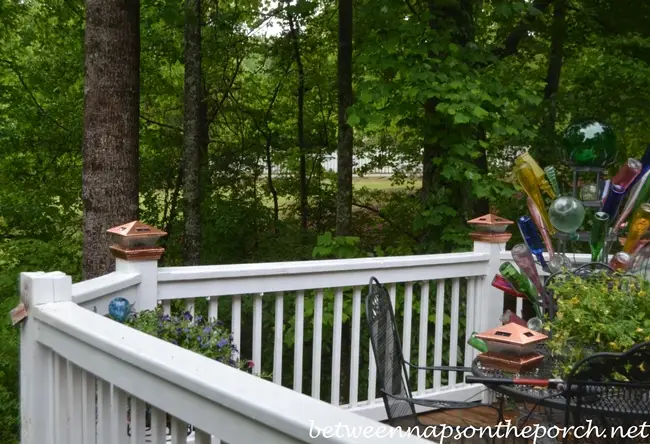
Pendant des années, j'ai eu deux mangeoires suspendues aux ponts flanquant le porche grillagé. Vous pouvez les voir sur cette photo ci-dessous à gauche et à droite.

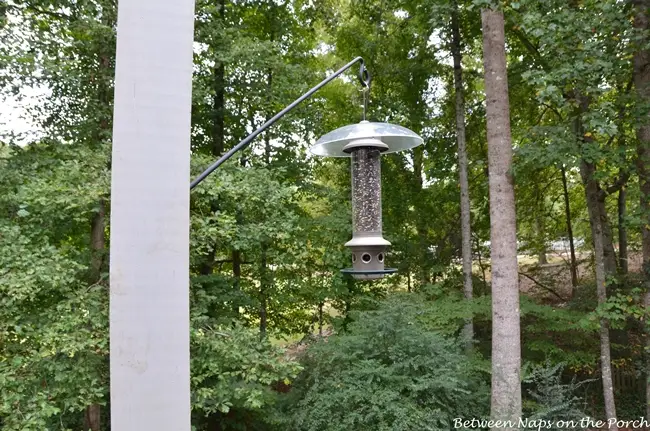
En septembre dernier, j'ai remplacé le crochet auquel pend la mangeoire de droite par un crochet de berger beaucoup plus long. pour tenter d'empêcher les écureuils rusés de sauter sur la mangeoire. Même si la mangeoire s'arrête lorsqu'un écureuil est dessus, les puants ont trouvé comment se suspendre la tête en bas par le haut pour ensuite détruire d'énormes quantités de graines, vidant ainsi la mangeoire en un rien de temps. Le crochet plus long combiné à un déflecteur a fait des merveilles. M. Squirrel ne tente même plus. Yay! Mettez-en un pour les humains dans la guerre des écureuils !
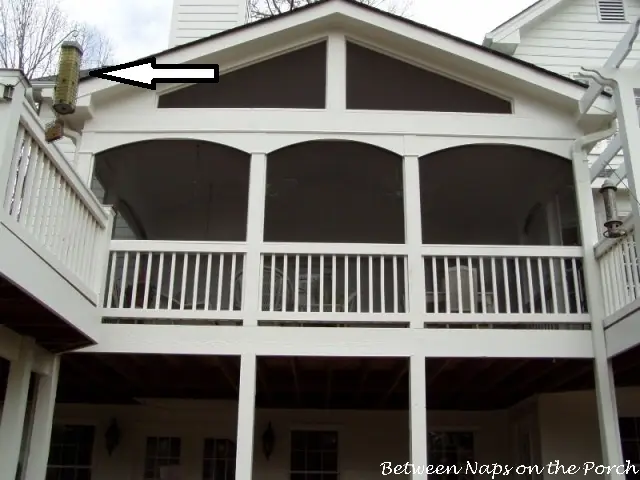
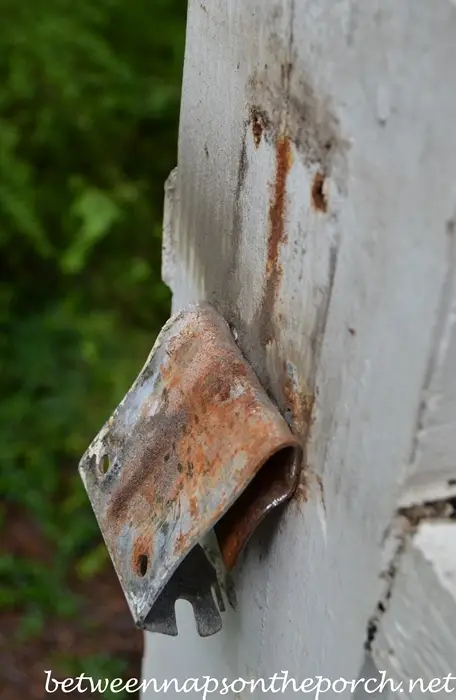
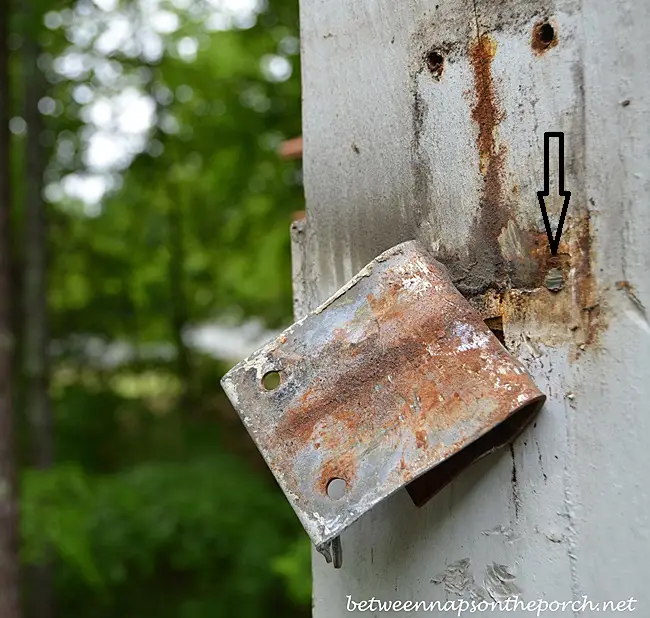
J'avais également espéré remplacer le crochet du berger sur la gauche. (Voir flèche)
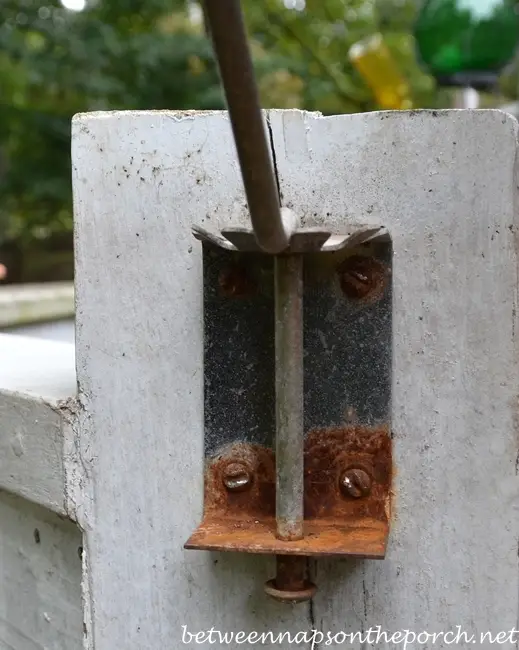
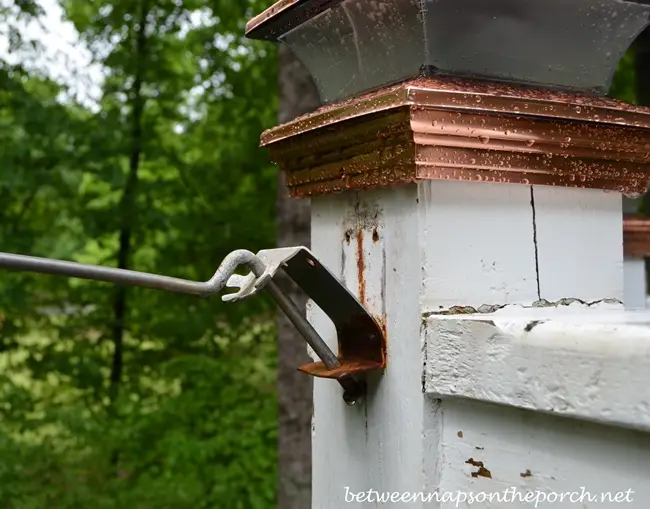
J'ai essayé de faire ça en septembre dernier lorsque j'ai changé l'autre mais j'ai rencontré un problème, un gros problème moche et rouillé. Les vis retenant le crochet sur le poteau étaient tellement rouillées que le dessus des vis s'est effondré lorsque j'ai essayé de les dévisser.
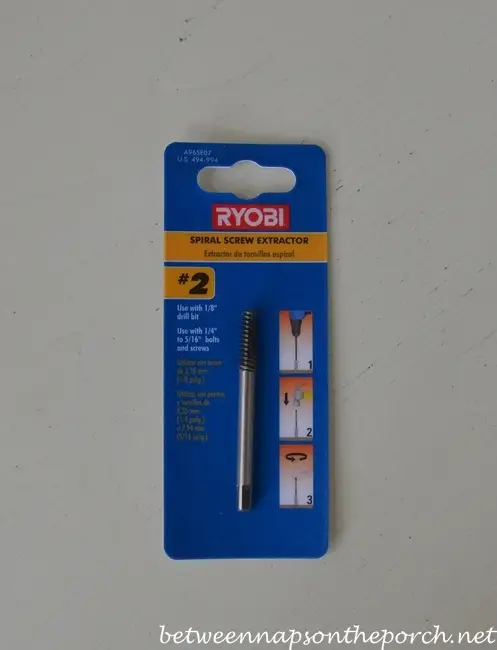
Vous vous souvenez peut-être que j'ai acheté unextracteur de vis en spirale pour tenter de percer la vis. Cela n’a absolument pas fonctionné et tout ce que j’ai fini par accomplir, c’est de casser un foret. Vous trouverez cet article de septembre ici : Squirrel Wars : le dernier tour dans ma manche
Ce vilain vieux crochet n'a pas disparu comme par magie pendant l'hiver. Non, il était toujours là, accroché au pont, se moquant de moi alors que j'embellissais le pont avec des fleurs ce week-end.
Il n'y avait que deux vis rouillées entre moi et le retrait de celui-ci. vieux crochet.
Pour savoir où se trouve ce crochet, il est suspendu sur le côté du pont avec l'arbre à bouteilles. Le voyez-vous là à gauche, accroché au poteau ? Je l'avais plié avant de prendre cette photo.
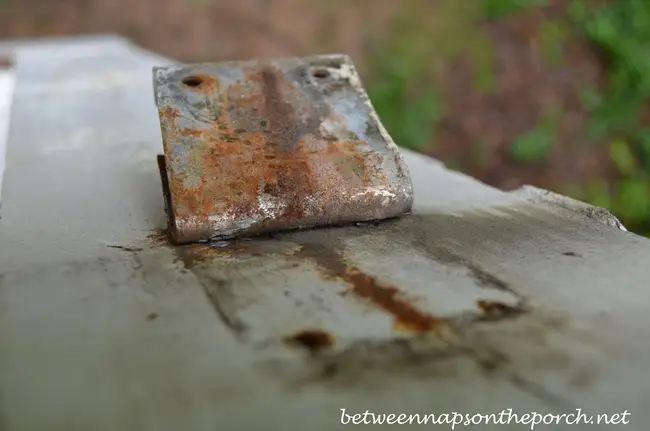
Je ne sais pas comment, mais j'ai réussi à retirer la partie tige lorsque je l'ai plié. C'est juste tombé. Il ne restait donc plus que la plaque de montage.
Histoire parallèle : Vous voyez à quel point le haut du poteau est tordu lorsqu'il n'est pas recouvert d'un capuchon de poteau ? Lorsque j'ai embauché mon entrepreneur pour ajouter la terrasse et le porche avec moustiquaire, je lui ai dit que j'utiliserais des capuchons en cuivre sur les poteaux. Je les ai même achetés avant la construction de la terrasse pour qu'il puisse les voir. Il a oublié de parler des capuchons de poteaux en cuivre à son équipe de pont et je suis rentré du travail un jour pour trouver le pont construit avec des poteaux pointus en forme de pyramide. Les gars du pont ont dû revenir en arrière et couper le dessus de tous lespoteaux et comme le pont était déjà construit, ils ont fait un travail assez épouvantable. Certains sommets de poteaux sont si mal formés que les capuchons de poteaux ne resteront pas à niveau dessus sans coller quelque chose en dessous. Quoi qu’il en soit, c’est pourquoi les dessus de poteaux ont l’air si horribles lorsqu’un capuchon de poteau n’est pas en place. Fin de l'histoire parallèle.
D'accord, revenons au problème du crochet : en septembre dernier, j'ai publié un article sur ce dilemme et j'ai ensuite reçu un e-mail des plus étonnants de Liz qui blogue sur le blog, Infuse avec Liz. Liz a partagé mon problème avec son génial mari et il a dressé une liste très détaillée de solutions possibles.
Dans l'e-mail qu'elle m'a envoyé, Liz a écrit :
J'ai écrit un e-mail à mon mari, je lui ai donné le lien vers votre histoire et je lui ai demandé son avis... voici sa réponse. C'est long mais minutieux.
Tout d'abord, « l'outil de solution » proposé par les gars de Home Depot consiste à retirer les vis qui se sont cassées à l'intérieur du métal. Cela ne s’applique pas dans ce cas. Et il est presque impossible de percer une vis à tête plate (fendue).
Plusieurs solutions à cette situation sont :
1) Utilisez un un ciseau neuf/pointu et un marteau d'environ 12 à 16 onces (ou plus) pour couper complètement la tête. Abandonnez la vis laissée dans le bois ou utilisez des VISE GRIPS pour retirer la vis une fois le support retiré.
2) Utilisez le même outil ciseau/marteau pour faire tourner la vis. Utilisez le3) Utilisez le même tournevis mentionné au point 2 comme « poinçon ». Cela signifie que vous devez placer le tournevis dans la fente comme si vous alliez l’utiliser « normalement », puis utilisez le marteau pour taper FORTEMENT sur l’extrémité du manche comme si vous essayiez de finir de planter un clou. Cela applique des vibrations à la tige et aide à desserrer la rouille tout en « plaçant » fermement le tournevis dans la fente. Appuyez au maximum sur le tournevis en direction de la tête de la vis pour éviter de « grimper » lorsque vous tournez le tournevis. Une aide simple pour faire tourner le tournevis tout en vous « penchant » dessus consiste à utiliser une paire de pinces de verrouillage (également appelées VISE GRIPS) sur la tige. Cela facilite la rotation tout en appliquant une « pression vers le bas ».
4) Utilisez ces VISE GRIPS pour serrer la tête de la vis afin d'essayer de démarrer la rotation. Terminez avec le tournevis.
5) Utilisez une Dremel avec une lame de scie pour affiner lafente et retirez la rouille au bas de la fente. Utilisez ensuite le tournevis mentionné précédemment pour terminer le travail.
6) Meulez la tête de la vis avec le Dremel et abandonnez la vis ou essayez de la/les retirer avec les VISE GRIPS. une fois le support retiré.
Les tournevis, les POIGNÉES ÉTAU, etc. doivent être en bon état, sinon une défaillance sera le résultat final. Les mâchoires usées d'un jeu de pinces (VISE GRIPS, etc.) causent plus de problèmes qu'elles n'en guérissent. Les tournevis qui ne sont pas tranchants ou qui ne sont pas correctement dimensionnés pour la tâche à accomplir « arracheront » invariablement une tête fonctionnelle, créant ainsi un autre problème. Voyez à quoi ressemble un nouveau tournevis. Et ne faites pas non plus référence à un tournevis « bon marché », car ils ne sont généralement pas formés correctement.
En ce qui concerne la taille d'un tournevis par rapport à la tête de vis, la largeur de la lame du tournevis est seulement une partie du jeu. Il doit avoir au moins la largeur de la tête de vis ET il ne doit pas bouger dans la fente tout en devant s'adapter au fond de la fente. Les tournevis cruciformes ont les mêmes exigences. N'utilisez pas un n°1 à la place d'un n°2 ou vice versa, etc. J'ai des tournevis cruciformes de taille 0,5 à 5. Une grande différence, en effet.
Et une note finale. Lors du montage ultérieur d'éléments comme celui-ci, utilisez du matériel en acier inoxydable (vis, etc.). Ce type d’acier ne rouille normalement pas. Parfois, un pré-perçage avec unUn petit peu avant d'utiliser l'attache peut être utile lorsqu'il est temps de retirer l'attache. N'utilisez pas de foret plus grand que la tige de la vis, car la pression du filetage sera trop faible pour être utile. Une autre astuce consiste à utiliser soit une cire liquide, soit une huile lubrifiante soit dans le trou, soit au moins sur les filetages. Soyez toutefois prudent car les bois tendres n’ont pas besoin d’être soulagés par perçage ou lubrification. Si vous le faites, la pression de retrait risque d'être trop faible pour maintenir votre projet en place.
N'est-ce pas une liste impressionnante d'idées !
Quand j'ai lu la suggestion de Dremel, cela a suscité une idée. Je n’avais pas de ciseau, j’avais besoin d’en acheter, mais je pensais pouvoir accomplir la même chose avec mon Dremel. Aujourd'hui, pendant notre bref répit sous la pluie, j'ai plié la plaque de base très, très loin.
Cela a exposé les vis là où je pouvais y accéder....
...avec ce mauvais garçon. Je voulais vraiment prendre une photo de la lame coupant la vis, mais je ne pouvais tout simplement pas me pencher sur le bord du pont à l'aide d'un outil de coupe tourbillonnant et prendre une photo en même temps. Et garde tous mes doigts. Ce que je préfère vraiment faire. 😉
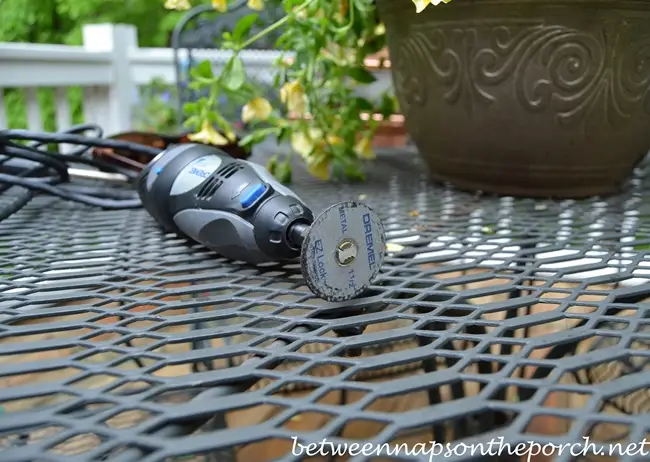
En un rien de temps, j'ai coupé la première vis... voir photo ci-dessous. Sérieusement, cela n'a pris que 8 secondes, même si c'était aussi long. À propos, assurez-vous toujours de porter des lunettes de protection lorsque vous utilisez un outil comme celui-ci. Je l'ai fait et j'étais vraiment contentparce que les étincelles et les morceaux de métal volaient comme des fous. Je recommande également des manches longues pour protéger vos bras.
J'ai coupé la deuxième vis, puis j'ai utilisé le Dremel pour lisser les picots métalliques, les rendant ainsi bien alignés avec le poteau. Il ne me reste plus qu'à calfeutrer et poncer toute cette zone, puis à lui donner une bonne couche de peinture.
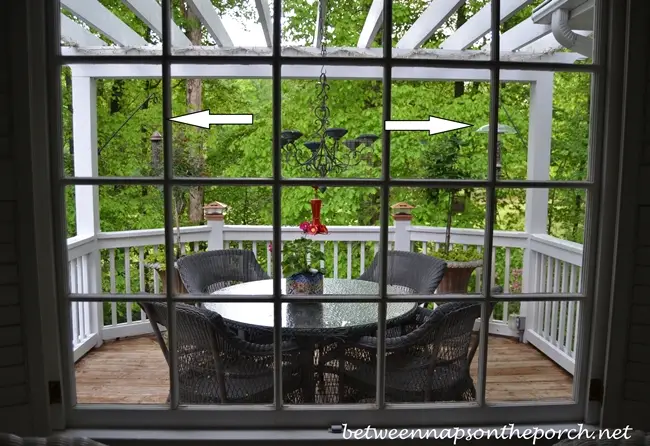
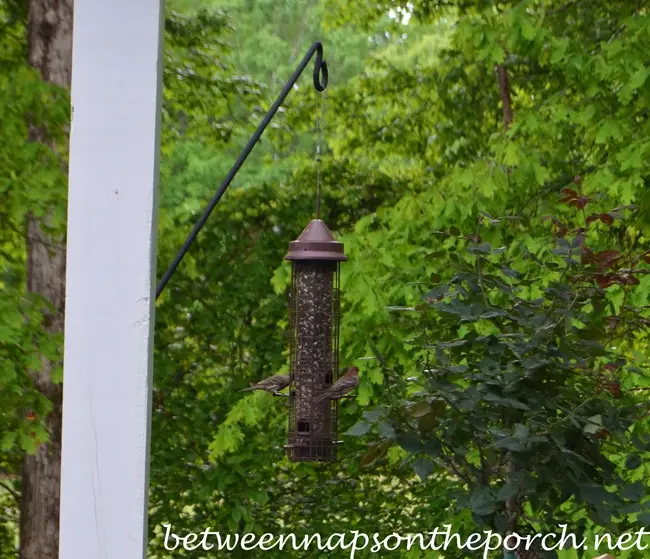
Je n'ai pas pu accrocher le nouveau crochet de berger plus long. au même endroit parce que le poteau et le crochet ont heurté les nouveaux capuchons de poteau lorsque je les ai maintenus en place. Je suis content maintenant qu’il ne rentre pas à cet endroit parce que j’ai trouvé un meilleur endroit pour le nouveau crochet. Je l'ai fixé de l'autre côté de la pergola. Celui de droite est celui que j'ai installé en septembre dernier et celui de gauche est le nouveau crochet que je viens d'installer aujourd'hui. Cette vue se fait à travers la baie vitrée de la salle de petit-déjeuner. Cet endroit fonctionne très bien puisque je peux me tenir près de l'évier de la cuisine ou n'importe où dans la cuisine et voir les oiseaux venir aux mangeoires.
Les oiseaux n'ont pas perdu de temps. arrivant au nouvel emplacement d'alimentation.
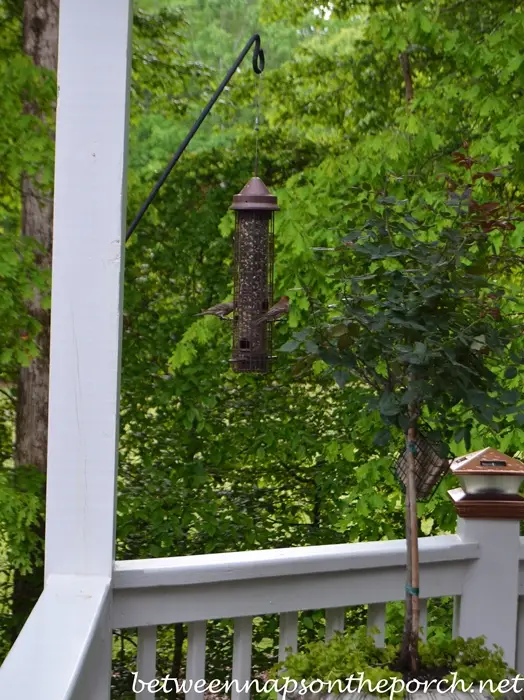
Je ne sais pas si ce sont des pinsons familiers ou des pinsons pourprés, je pense que ce sont des pinsons familiers. Cette mangeoire s'arrête également si un écureuil monte dessus. Je dois également acheter un déflecteur pour que les écureuils ne tentent pas de pendre du haut.
J'ai réussi à faire plusieurs autres choses à l'extérieur aujourd'hui, je les partagerai bientôt. jeje sais que ce n’était pas la plus jolie métamorphose, mais c’était définitivement une métamorphose satisfaisante ! C'était vraiment agréable de se débarrasser de ce cintre rouillé.
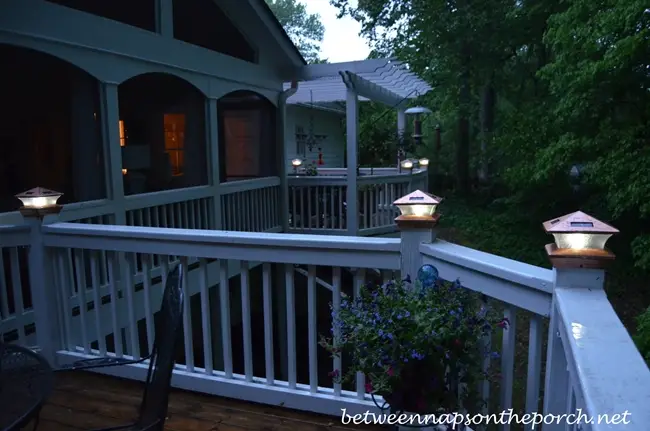
Qu'as-tu fait ce week-end ? Réaliser des projets que vous avez reportés ? J'espère que tu as vu du soleil. C'était tellement nuageux et dégueu aujourd'hui, alors que j'ai créé ce message vers minuit, j'ai remarqué que les lumières solaires sur le pont étaient déjà éteintes. Ils n’ont tout simplement pas eu assez de soleil aujourd’hui pour rester allumés plus de 2 à 3 heures. Mais les jours ensoleillés arrivent... c'est ce que je crois.
J'ai réussi à prendre une photo pour vous plus tôt ce soir, avant que toutes les lumières du pont ne s'éteignent pour la nuit. Il pleuvait encore (bien sûr) lorsque j'ai pris cette photo. Alors que je travaillais dans mon bureau ce soir, j'ai entendu un hibou hululer dans les arbres. J'ai couru en bas et sur le porche pour l'enregistrer avec mon téléphone afin de pouvoir le partager avec vous, mais malheureusement, il s'est arrêté. J'aime, j'aime, j'adore entendre les hiboux ici. Je le capturerai en train de hululer sur mon téléphone un soir et quand je le ferai, je le partagerai avec vous. J'adore ce son !
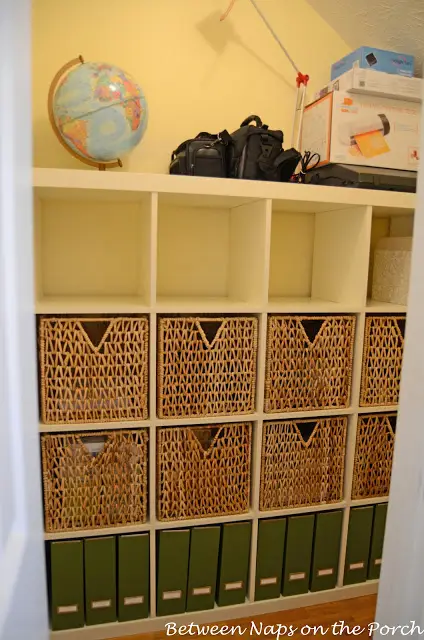
J'adore vraiment mon Dremel ; cela m'a sorti de tant d'embouteillages. Rappelez-vous quand il a sauvé la situation dans mon placard fou Expedit hack ! Vous pouvez en savoir plus ici : Ikea Expedit Hack : Comment je l'ai fait fonctionner
J'attends avec impatience les avant et après publiés pour ce lundi du Met !
Métamorphose