Lundi, nous célébrons notre 500e Métamorphose !
Bienvenue au 500ème lundi de la Métamorphose !
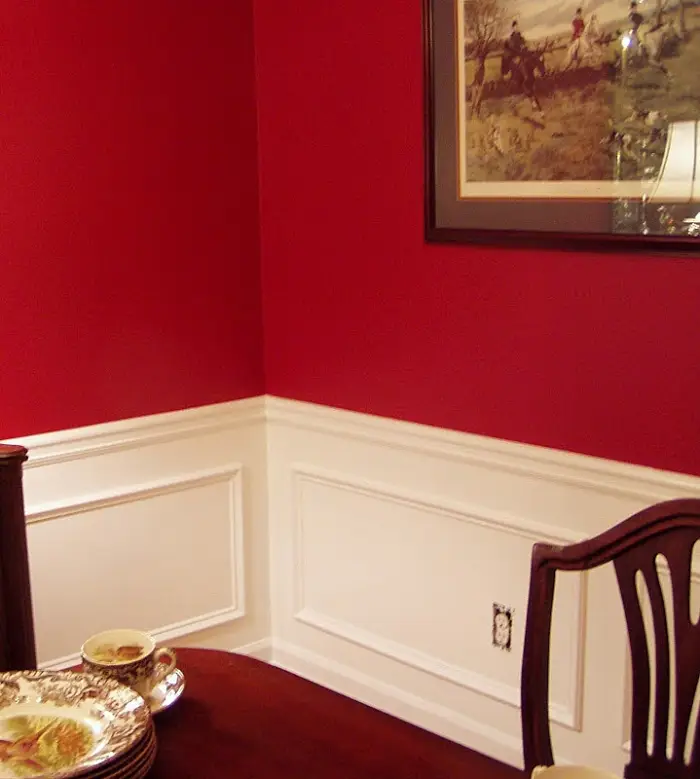
Nous venons de célébrer les 500 jeudis Tablescape il y a quelques semaines. Cette semaine, nous avons atteint notre 500e lundi de métamorphose ! Je repensais ce soir à la façon dont Met Monday a commencé. Notre soirée Met Monday a commencé quelques semaines après avoir partagé des photos avant et après dans un article du 2 janvier 2009 d'un changement que j'avais apporté dans ma salle à manger. (Voir cet article ici : Relooking de la salle à manger.)
Dans cet article, j'ai partagé des moulures d'images que j'avais récemment ajoutées dans ma salle à manger. J'avais également peint en blanc sous la cimaise. Ce fut un changement radical et a grandement amélioré l’apparence de la pièce. Ce message a reçu tellement de commentaires que j’ai réalisé qu’un avant et un après était quelque chose que nous appréciions tous vraiment. Le lundi des métamorphoses a débuté pour la première fois le lundi 19 janvier. Quels 500 semaines formidables ont été !
Entre les siestes sur le porche a également franchi une étape importante au début du mois. Le 18 août, le BNOTP a fêté ses 10 ans ! Wow, le temps a passé si vite ! Merci d'être ici chaque jour parce que VOUS êtes ce qui rend les blogs si amusants !
Célébration des 500 semaines de métamorphose lundi
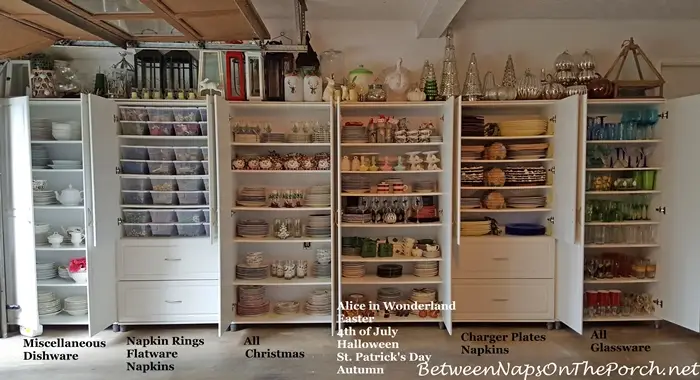
À la fin de la semaine dernière, Met Monday post , j'ai suggéré que nous partagions des liens vers 5 à 10 de nos avant et après préférés ou les plus difficiles pour célébrer cette 500e fête du Met Monday. Honnêtement, j'ai eu du mal à préciserJ’avais imaginé ajouter des étagères au garage, c’était pour ranger les fournitures de jardinage. L’utiliser pour ranger la vaisselle que j’ai collectionnée au cours des 40 dernières années a été beaucoup plus amusant ! J’aime vraiment avoir tout ce dont j’ai besoin pour mettre la table pour des amis, de la famille ou pour le jeudi de Tablescape, le tout au même endroit. Pour en savoir plus sur cet avant et après, cliquez ici : Rangement pour la vaisselle, les couverts, les ronds de serviette, les serviettes et la verrerie dans un aménagement paysager.
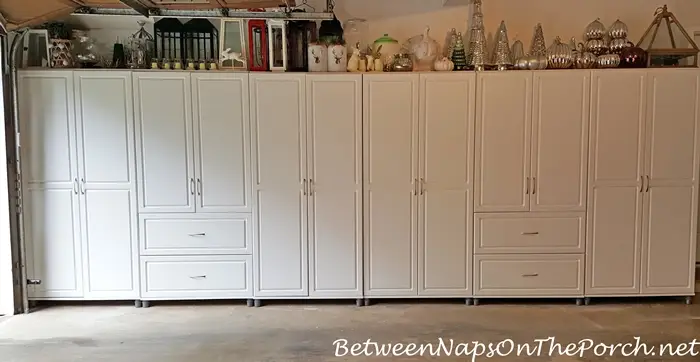
Les deux questions que l’on me pose toujours à propos de cet espace sont : la vaisselle reste-t-elle propre ET ne fait-il pas trop chaud/froid dans le garage ?
La vaisselle reste propre, probablement parce que les portes la protègent. Je souffle également dans mon garage toutes les deux semaines, donc il ne se salit jamais vraiment.
En ce qui concerne la température, cet espace ne devient jamais extrêmement froid ou extrêmement chaud car il est entouré d’espaces chauffés/refroidis en dessous, au-dessus, à gauche et à l’avant, ne laissant que deux côtés « exposés ». Ce garage est toujours à une température assez modérée, même pendant les périodes les plus chaudes et les plus froides de l’année. Si votre garage n’est pas entouré d’espaces chauffés/refroidis sur autant de côtés, cette solution peut ne pas fonctionner pour votre stockage.
N’oubliez pas non plus que la vaisselle est très résistante et que la plupart sont conçues pour être lavées à haute température dans le lave-vaisselle. Je ne stockerais pas de vaisselle ancienne ici, mais même cela conviendrait probablement car les températures n’atteignent jamais les extrêmes.
Comme nous entrons bientôt dans les mois d'automne, je terminerai cet article de célébration du lundi de la Métamorphose avec un dernier projet qui était un défi mais tellement amusant à réaliser : un Hot Cocoa. panneau indiquant une petite station de chocolat chaud que j'ai installée dehors sur le porche.
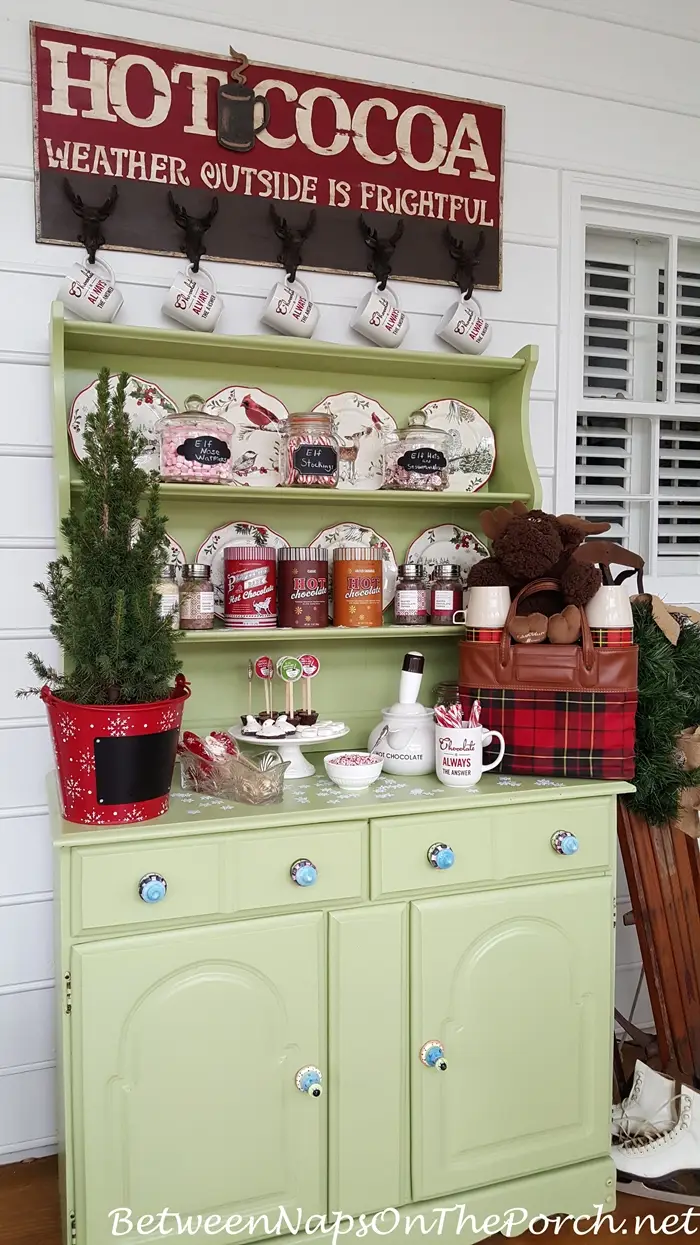
J'avais vu ce panneau sur un autre blog mais malheureusement, il n'a jamais été disponible dans mes Marshalls locaux. la fois où j'ai vérifié. Après l'avoir cherché pendant quelques années, j'ai réalisé que je devrais en fabriquer moi-même.
J'adore l'exposer ici, sur le porche, chaque année ! Si vous souhaitez réaliser votre propre pancarte Hot Cocoa pour votre barre de chocolat chaud d'hiver, vous trouverez le tutoriel pour réaliser cette pancarte ici : Hot Cocoa Sign.
Vous trouverez plus de détails sur la station Cocoa. dans cet article : Créez une barre de chocolat chaud pour recevoir en hiver.
Vous voyez le petit élan ?

C'est un « élan au chocolat » et il sent juste aime le chocolat! N'est-ce pas rigolo ?! Les mots Chocolate Moose sont brodés au bas de son petit pied pelucheux. Tu sais que je ne grandirai jamais, n'est-ce pas ? 😉

Merci beaucoup d'être là pour tant de lundis Métamorphose ! VOUS êtes la meilleure partie de mon parcours de blogueur et je vous suis reconnaissant ainsi que vos mots d’encouragement chaque jour ! ♥♥♥
Dans l'attente de 500 semaines supplémentaires de fabuleux avant et après !
Pssst : Je publie presque quotidiennement sur Instagram. Suivez Entre les siestes sur le porche sur Instagram ici : Entre les siestes sur le porche.
Si vous avez apprécié cet article, abonnez-vous pour recevoir des mises à jour gratuites par e-mail lorsqu'un nouveau message est publié ici : Abonnez-vous pour le message mises à jour.
Conseil : Si possible, veuillez ne pas utiliser une adresse e-mail Hotmail pour vous abonner. Les serveurs de Hotmail sont connus pour filtrer les e-mails parfaitement bons.
Metamorphosis Monday
Metamorphosis Monday est une fête axée sur l'avant et l'après. Si vous participez au Met Monday, veuillez vous connecter en utilisant le « lien permanent » vers votre article MM et non vers l'adresse générale de votre blog. Pour obtenir votre permalien, cliquez sur le nom de votre article, puis copiez et collez simplement l'adresse qui apparaît dans la barre d'adresse en haut de votre blog, dans la case « url » pour InLinkz.
Afin de créez un lien, vous devrez inclure un lien dans votre message MM vers la fête afin que les autres participants aient la possibilité de recevoir la visite de vos merveilleux lecteurs de blog.
Veuillez respecter ces quelques règles :
Veuillez créer un lien vers les publications Avant et Après qui concernent la maison, le jardinage, la décoration, l'artisanat, la peinture, la couture, la cuisine, la mode ou le bricolage.
Assurez-vous d'inclure un lien vers la fête dans votre postez, afin que vos lecteurs puissent trouver et visiter les autres blogueurs qui participent.
Ne vous associez pas à la fête si vous êtes seulementle faire pour promouvoir ou vendre un produit.
À ceux qui établissent un lien : si vous remarquez qu'une boutique ou une boutique en ligne crée un lien pour vendre des produits (oui, malheureusement, cela arrive), veuillez me le faire savoir afin que je peut supprimer leur lien et les empêcher de participer à de futures fêtes. Personne ne veut cliquer sur un lien en attendant un avant et un après, uniquement pour trouver un lien spam vers une entreprise/une boutique en ligne.

Je ne peux pas célébrer notre 500e lundi de Métamorphose sans mentionner « l'Avant et l'Après » qui, à bien des égards, est responsable de l'existence de le blog Entre les siestes sur le porche : l'ajout d'une véranda grillagée à l'arrière de ma maison. Lorsque j'ai partagé quelques photos de mon nouveau porche sur le site Web « Rate My Space » de HGTV en 2008, quelques êtres chers m'ont encouragé à créer un blog.
Ajouter un porche avec moustiquaire à ma maison en était définitivement une. des plus grands avant et après que j'ai jamais entrepris. L'ancienne terrasse de ma maison était mal conçue et n'était pas dans un état optimal.
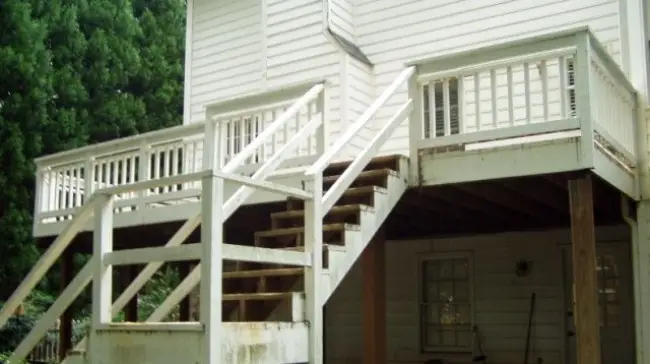
Elle a été retirée...
...et deux terrasses et un porche avec moustiquaire ont été ajoutés à sa place.
Après, c'était comme s'ils avaient toujours été là.
En savoir plus sur cette métamorphose ici : Ajout d'un porche grillagé et ici : Combien coûte la construction d'un porche grillagé.

J'ai toujours aimé les porches. Cette photo montrant le porche de la maison de Gainesway Farm dans le Kentucky était rangée depuis longtemps dans mon dossier « un jour ». Lorsque j'ai remplacé la terrasse arrière par un porche grillagé et deux terrasses plus petites, j'ai décidé d'aller de l'avant et d'ajouter également un porche avant. Mon entrepreneur a fait de son mieux pour reproduire l'apparence de ce porche pour moi.

Photo de SouthernHomes Magazine
Je n'ai pas de photo d'Avant prise de loin, mais j'ai pensé à prendre cette photo après la dépose du vieux perron. Auparavant, il n'y avait qu'un perron en brique sans porche, donc il n'y avait aucune protection pour les amis ou la famille lors d'une visite lorsqu'il pleuvait.
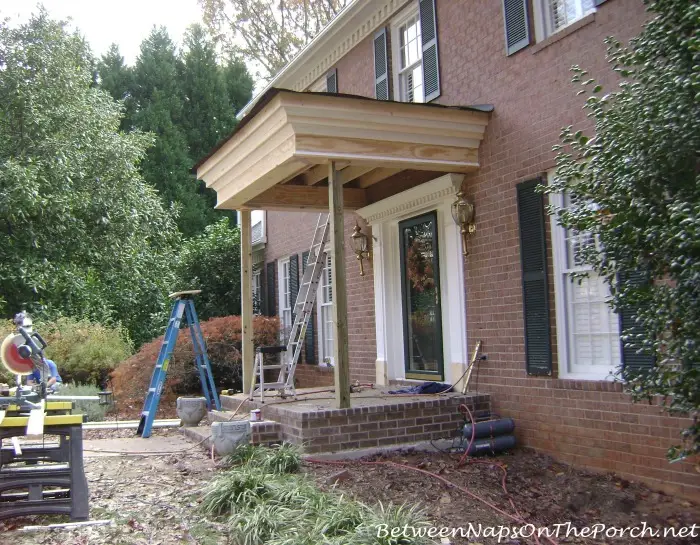
Pour en savoir plus sur la construction du porche, consultez cet article : Combien coûte la construction d'un porche.

Cette métamorphose suivante a commencé le 28 juin 2013. Ma maison était lentement envahie par de grands arbustes et des arbres. Je n’avais pas réalisé à quel point jusqu’à ce que certains d’entre eux soient retirés. L’aménagement paysager de la cour avant n’a pas été un avant et un après du jour au lendemain. Cela a pris quelques années, mais cela en valait vraiment la peine.
Voici à quoi ressemble la maison aujourd'hui.

Je vais faire couper considérablement les buissons de Carissa Holly au printemps prochain. Je les ai fait tailler il y a environ un an et ils n'ont pas été réduits autant que je l'avais demandé.
Quelqu'un connaît le meilleur moment pour réduire considérablement une Carissa Holly ? J’aimerais qu’ils fassent environ la moitié de leur taille actuelle. Je sais qu’ils seront laids pendant un moment, mais ils sont tout simplement trop gros à ce stade. Il se peut que je doive les supprimer entièrement.

Trop de changements ont eu lieu dans ce paysage frontal pour les expliquer tous dans cet article. Les arbres etdes arbustes ont été enlevés, des arbres/arbustes ont été plantés, la cour a été recouverte de Zeon Zoysia, des nichoirs/pièces d'accent ont été ajoutés – tant de choses ont été faites.
Si vous souhaitez lire certains des articles de cette période, consultez cette page : Jardin. Faites défiler cette page et vous verrez des liens vers tous les articles relatant cette métamorphose spectaculaire de l'aménagement paysager et du jardinage.
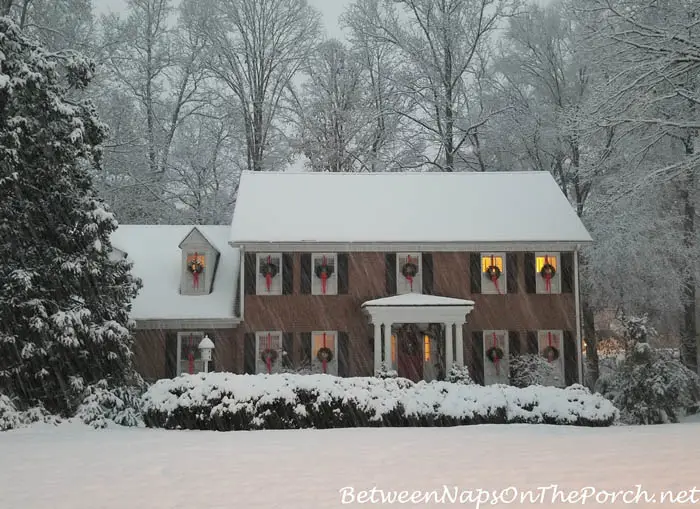
Photo prise par ma voisine, Michelle.
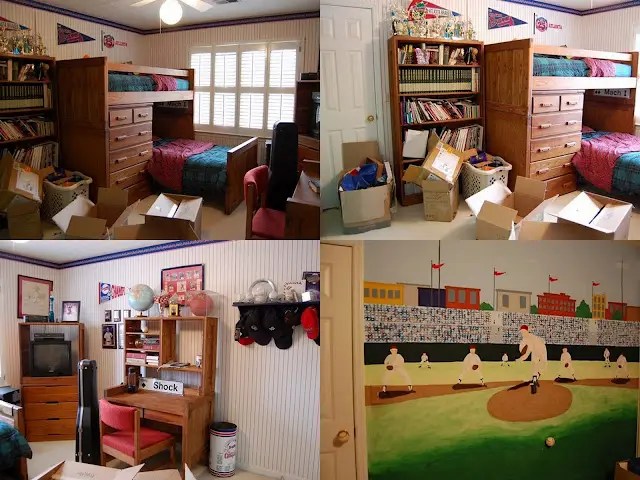
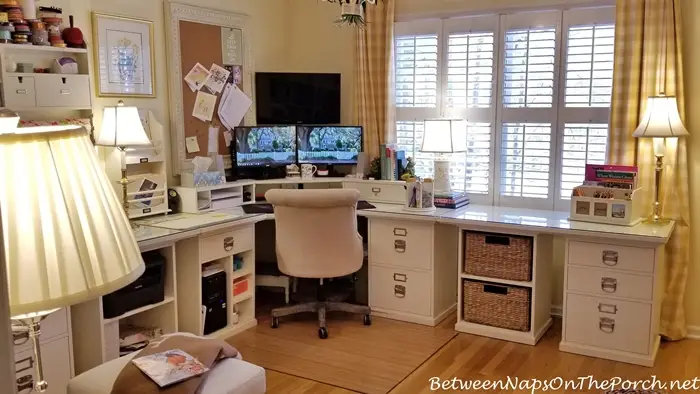
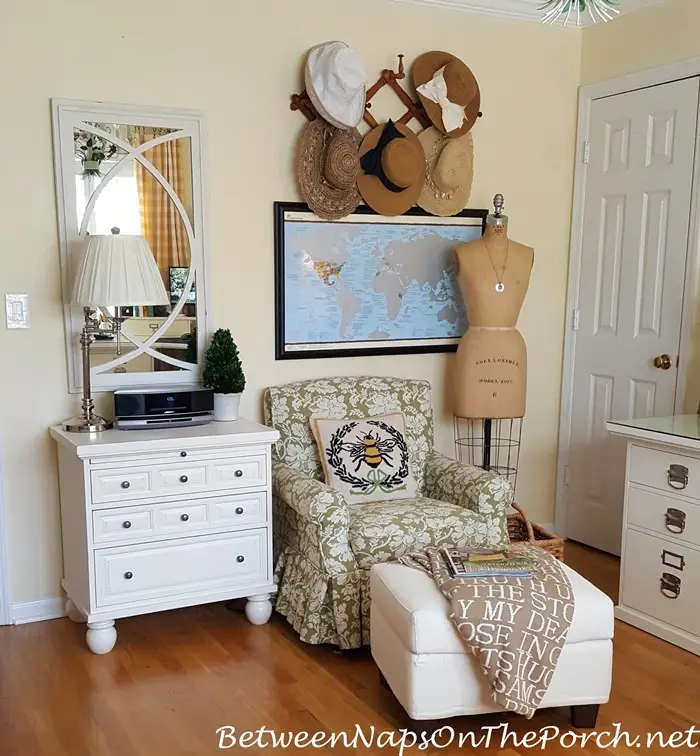
Si vous avez Je lis BNOTP depuis mes premières années, vous vous souviendrez du moment où j'ai malheureusement démonté l'ancienne chambre de mon fils et l'ai transformée en bureau à domicile. Il avait quitté l'université au moment où j'ai fait ça, mais c'était toujours très difficile à faire.
J'ai fait tout le travail moi-même, y compris démonter les lits et transporter tous les meubles jusqu'au garage où ils se trouvent. depuis lors, il est entreposé. Mon fils et mon copain pensent qu'ils voudront l'utiliser avec leurs fils, alors je l'ai gardé tout ce temps juste au cas où ils en auraient besoin.
Pour Pour en savoir plus, consultez cet article : Concevoir et créer un bureau à domicile : le parcours.
Vous trouverez tous les articles que j'ai partagés à ce sujet. cette pièce ici : Bureau à domicile.

Je passe beaucoup de temps ici et j'apprécie cet espace. Il n’y a vraiment rien que je changerais ou ferais différemment concernant ce relooking. Cela a pris un certain temps car je cherchais uniquement les pièces que j'avais en tête. Parfois c'estFrançaismieux vaut y aller doucement car on peut changer d'avis plusieurs fois au cours du processus de rénovation d'une pièce.
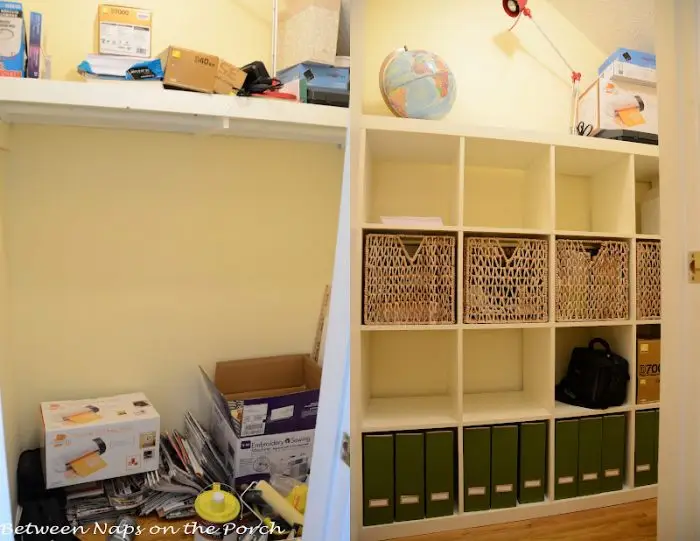
L'un des avant/après les plus délicats que j'ai jamais partagé sur le blog était cette installation folle d'Expedit. Je voulais tellement un Expedit à l'intérieur du placard du bureau pour le stockage, mais l'Expedit était à 3/4 de pouce de la même largeur que le placard lui-même !
Il n'y avait aucun moyen de construire l'Expedit à l'extérieur du placard et de l'amener par la porte pour le faire pivoter en place. Après beaucoup de réflexion, j'ai trouvé un moyen de le construire en place, ce qui n'est pas une mince affaire puisque les Expedit sont normalement construits allongés afin que les vis sous le fond puissent être serrées en place. J'ai trouvé un moyen de le faire et j'ai partagé ces détails dans un article.
Vous pouvez voir à quel point il restait peu d'espace à chaque extrémité de l'Expedit sur les deux photos suivantes.
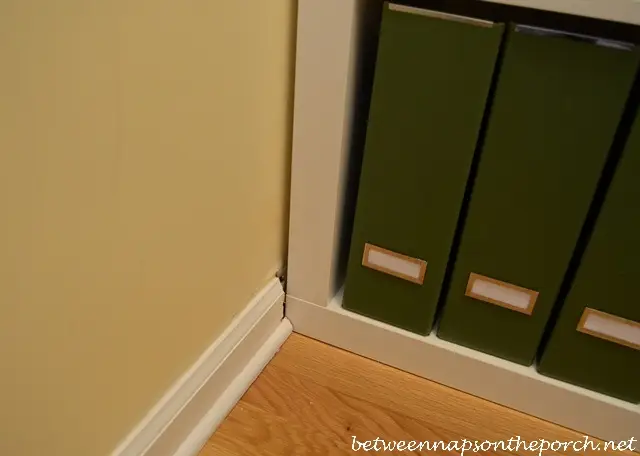
En plus de le construire sur place, j'ai dû couper une petite partie de la moulure de la plinthe juste pour l'adapter, ce qui lui a donné un aspect « intégré ».
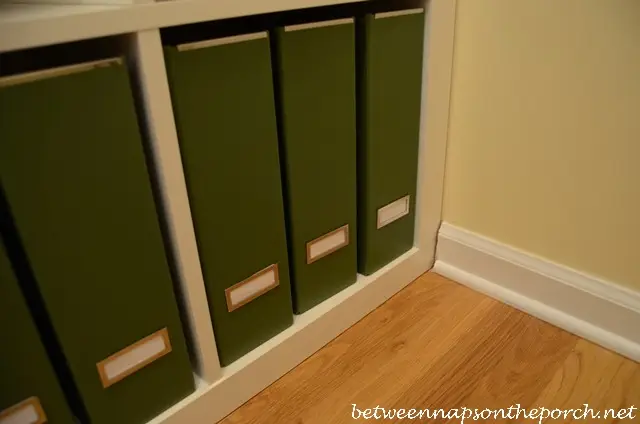
Je l'adore et je l'utilise tous les jours. Il offre le rangement parfait pour tout ce dont j'ai besoin ici au bureau au quotidien. Lisez comment j'ai réussi à le construire dans ce petit espace ici : IKEA Expedit Hack : How I Made It Work.

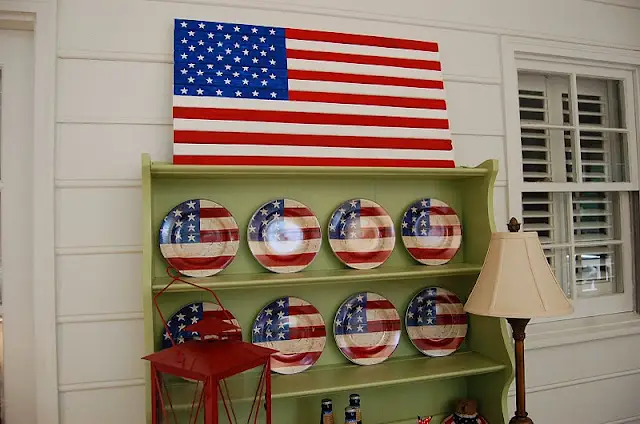
L'un des premiers projets de menuiserie/artisanat que j'ai réalisés et partagés était unessayez de fabriquer un drapeau en bois similaire à celui que j'avais vu sur le site Web de Pottery Barn. J'ai adoré son apparence, mais j'avais besoin d'une version légèrement plus petite pour le porche.
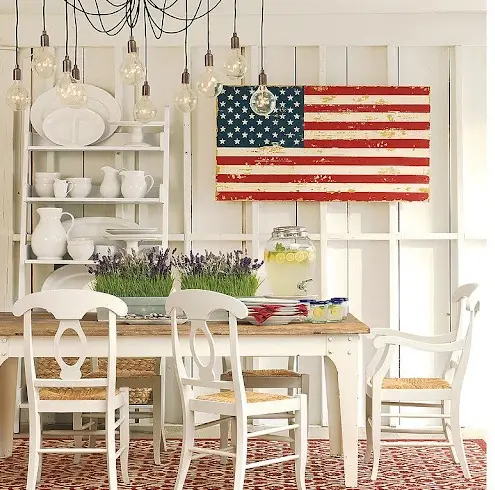
Ce petit tas de bâtons...
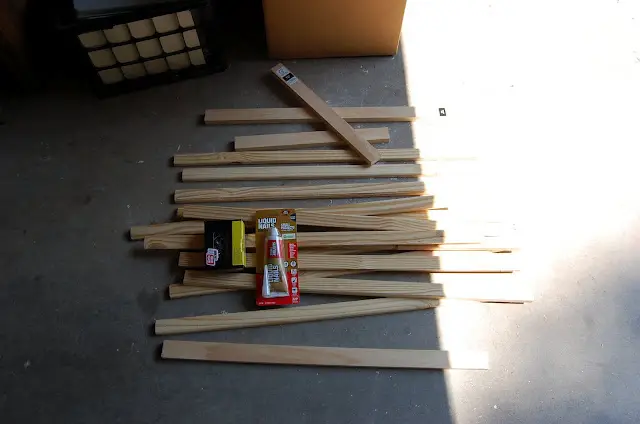
... a lentement commencé à ressembler de plus en plus à un drapeau.
J'aime toujours sortir ce drapeau pour les fêtes patriotiques. Vous trouverez le tutoriel simple pour le réaliser ici : Fabriquer un drapeau en bois pour célébrer les fêtes patriotiques.
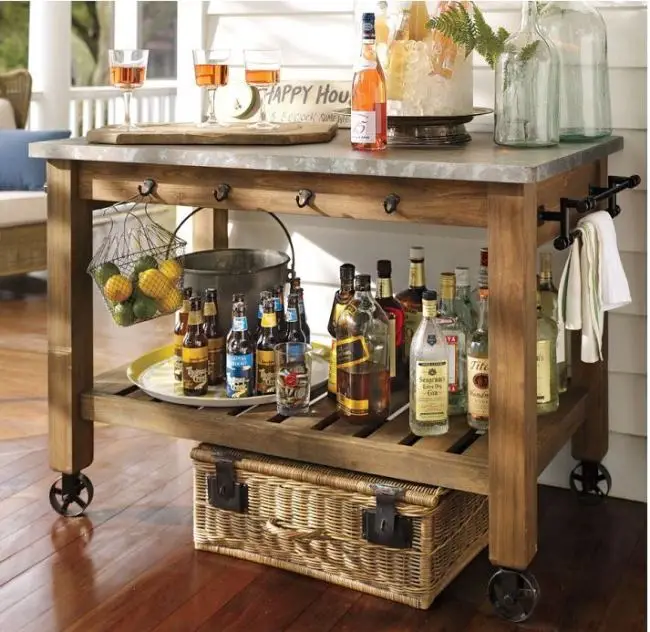
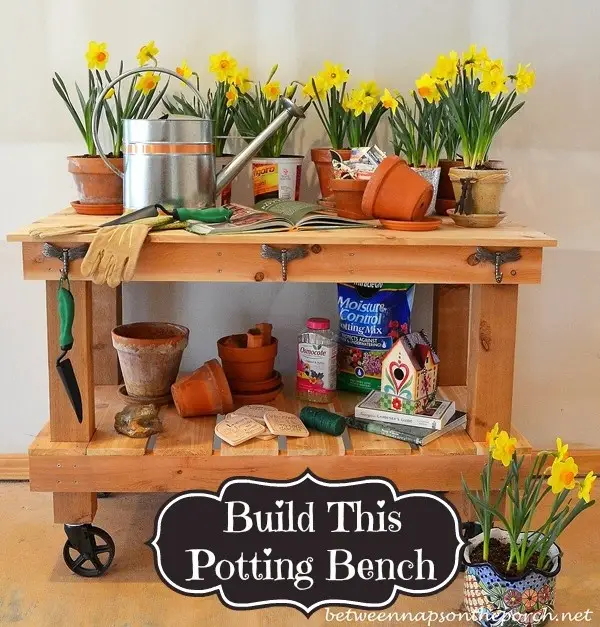
Avez-vous déjà vraiment voulu quelque chose, mais vous ne pouviez tout simplement pas justifier le coût ? C’est la situation dans laquelle je me suis retrouvé avec cette adorable table de rempotage Pottery Barn. Si je me souviens bien, son prix dépassait largement les 1 000 $.
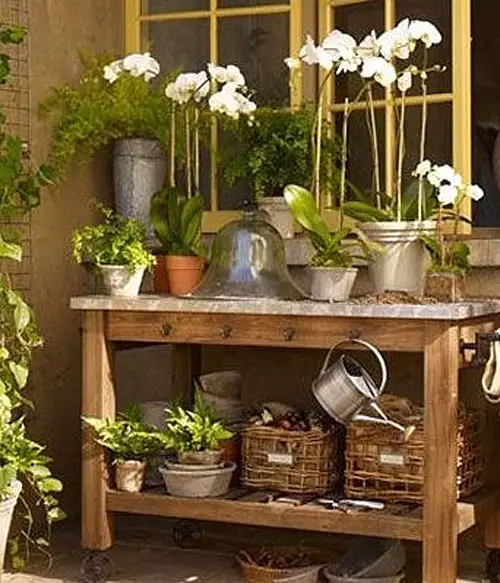
J'ai adoré le fait qu'il puisse également être utilisé comme serveur extérieur pour les fêtes.
N'ayant aucune expérience dans la construction de quoi que ce soit, j'ai décidé de l'essayer. Qu'avais-je à perdre ? Je n’avais aucun projet, je l’ai compris au fur et à mesure. Lorsque j'avais une question sur la façon de faire quelque chose, je regardais des vidéos YouTube en ligne.
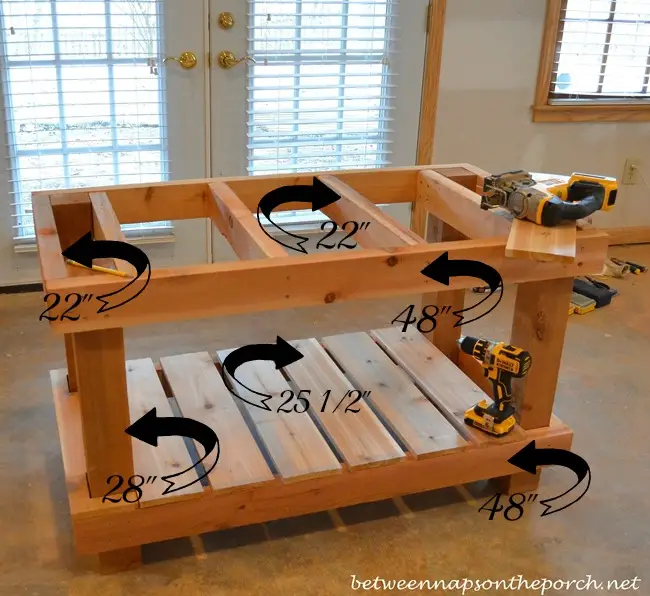
J'ai commencé avec un petit tas de bois de cèdre. J'ai fait couper les quatre pieds à la taille dont je pensais avoir besoin, puis j'ai coupé tout le reste à la bonne taille au fur et à mesure que je construisais la table.
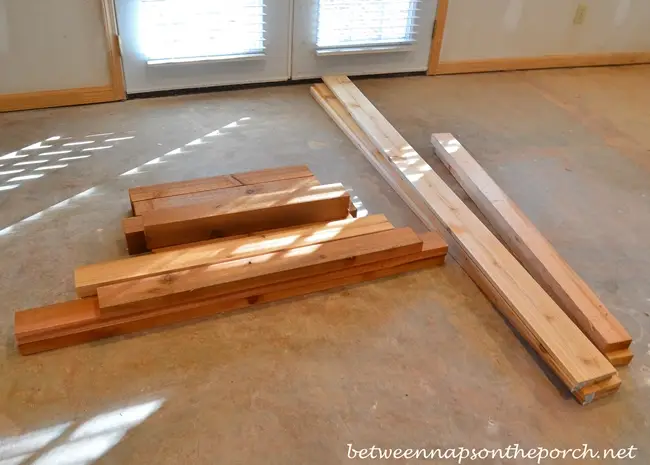
Voici à quoi cela ressemblait en voie d'achèvement .
Et voici le produit fini.
Cette table d'empotage est toujours en bas dans mon sous-sol. J'étaisJe vais l'utiliser à l'étage sur la terrasse, mais il n'y a jamais eu de bon moment pour que quelqu'un le déplace sur la terrasse. Si jamais j’aménage mon jardin comme je le voudrais, je le sortirai sous le porche grillagé pour le rempotage. Je l'ai utilisé plusieurs fois dans le sous-sol partiellement aménagé. J'ai un autre banc d'empotage que j'utilise beaucoup à l'étage dans mon garage lorsque je travaille dans la cour avant et que je rempote des plantes pour les terrasses.
J'adore le résultat. C'était un défi et ma construction m'a pris pas mal de temps car j'ai dû d'abord apprendre à utiliser une scie circulaire et une scie sauteuse.
Si vous souhaitez construire cette table d'empotage vous-même, vous trouverez tout les informations dont vous avez besoin dans ces deux articles : Construisez une table d'empotage ET des dimensions/liste de coupe pour la table d'empotage.
Démangeaisons de construire autre chose une fois que j'ai terminé la table, je me suis tourné mon dévolu sur cet adorable organisateur de casiers que j'avais toujours admiré sur le site Pottery Barn.
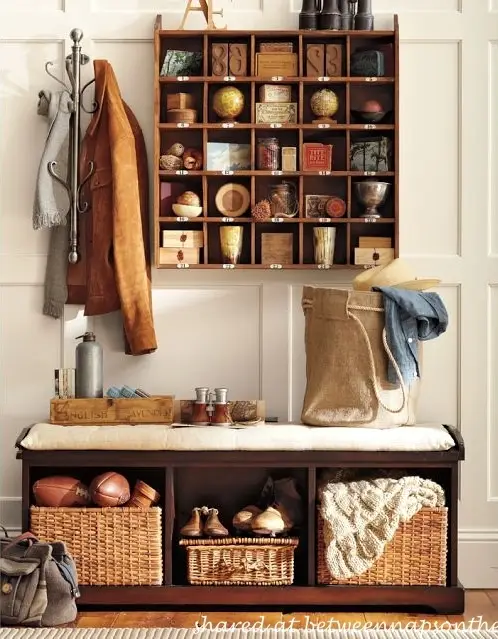
Une fois terminé, j'ai pensé placer le mien dans mon bureau à domicile, mais j'ai fini Je l'ai utilisé dans mon petit atelier de fortune ici au sous-sol.
Trouvez le tutoriel pour construire cet organiseur cubby ici : Cubby Organizer.

Ce prochain projet « Avant et Après » n'était pas difficile, mais je l'inclus dans cet article de célébration du 500e Met Monday parce qu'il prenait beaucoup de temps. Je suis tombé sur ces jolis chargeurs de coquillages Pottery Barn sureBay il y a quelques années. J'avais espéré enchérir sur eux, mais les enchères ont rapidement grimpé à plus de 200 $ pour 6 chargeurs ! 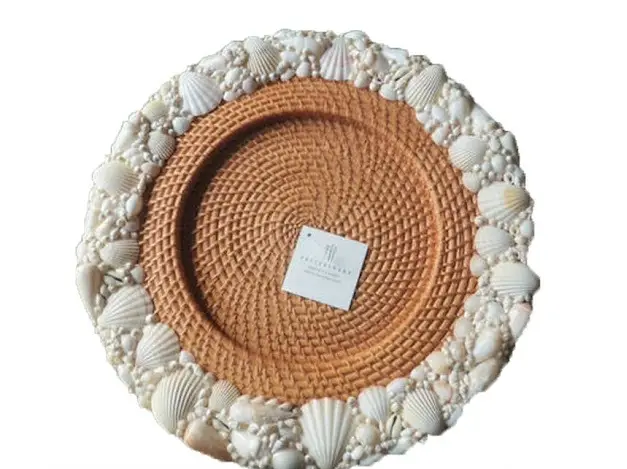
J'ai décidé de fabriquer mes propres chargeurs d'obus en utilisant des obus collectés sur l'île de Captiva en 1983. J'en avais beaucoup d'obus donc ceux que j'avais récupérés à Captiva constituaient la majorité des chargeurs. J'ai comblé toutes les lacunes avec des obus de Marshalls et un tout petit que j'ai trouvé en ligne. Ils ont pris beaucoup de temps à réaliser mais en valaient vraiment la peine au final. J'ai vraiment aimé les utiliser pendant les mois d'été.
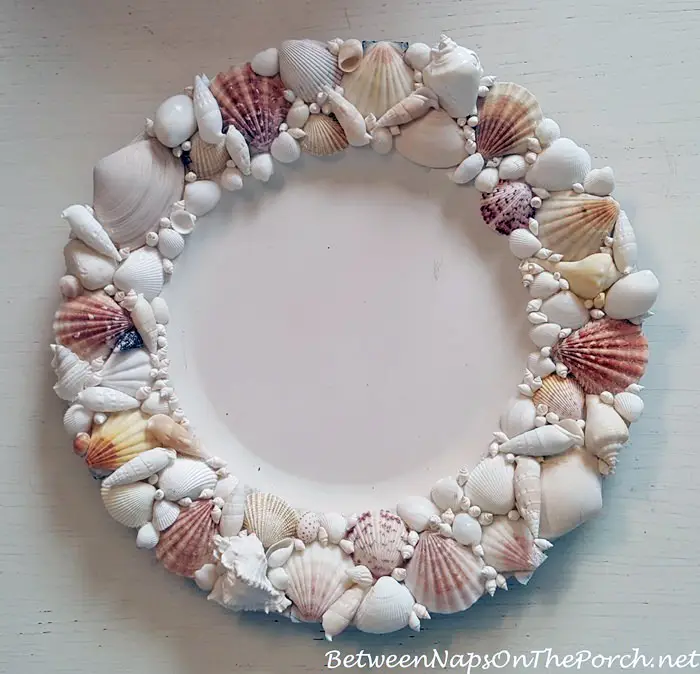
Il me restait encore beaucoup d'obus et j'étais un gourmand en punition, j'ai fabriqué 6 autres chargeurs plus tard, en ajoutant dans quelques morceaux de « verre de mer » bleu trouvés à Marshalls. C'est un projet amusant à réaliser en regardant un film et/ou en écoutant un livre sur Audible.
Au final, j'ai eu mal au bout des doigts à force de pousser tous ces petits des coquilles pointues en place, mais j'ai tellement aimé les utiliser ces derniers étés. Vous trouverez des instructions pour fabriquer ces chargeurs de coquillages ici : Chargeurs de coquillages et ici : Chargeurs de coquillages avec verre de mer.
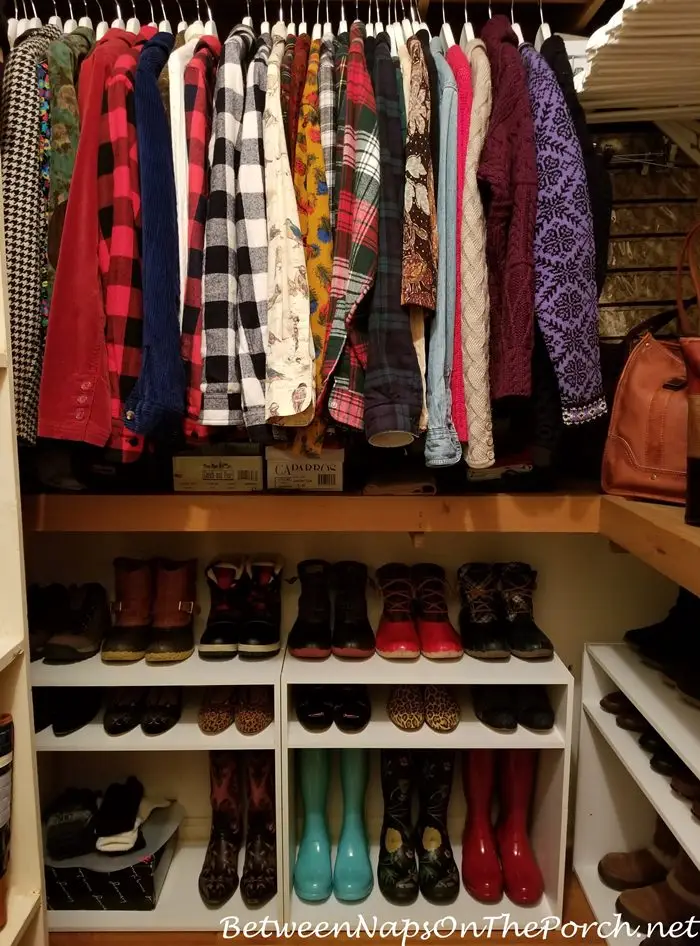
Ce prochain projet n'était pas le plus chic au monde, mais j'étais content du résultat car cela coûtait très peu, trop complet et apportait une telle amélioration dans ma vie de tous les jours. J'avais besoin d'une meilleure façon de ranger mes chaussures et mes sacs à main d'hiver. Je n’ai pas pris de photo « avant » (j’aurais aimé l’avoir maintenant) mais toutes mesles chaussures étaient simplement alignées tout au long du sol du placard, occupant tout l'espace de « promenade » à l'intérieur du placard. C'était une très mauvaise utilisation de l'espace.
J'ai acheté des étagères que j'ai trouvées en ligne sur Target et j'ai repensé leur fonctionnement. Cela impliquait de retourner les étagères, de percer de nouveaux trous et de reconfigurer complètement les étagères pour accueillir mes bottes hautes et autres chaussures.
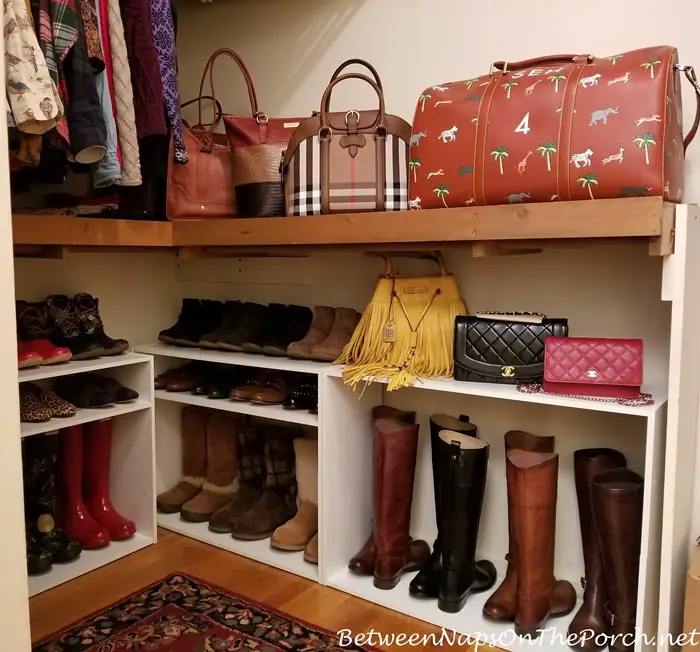
Cela fonctionne toujours très bien pour mes besoins. Récemment, j'ai fait don de quelques paires de chaussures que je portais rarement, donc cet espace continue de fonctionner à merveille pour ma garde-robe d'hiver.
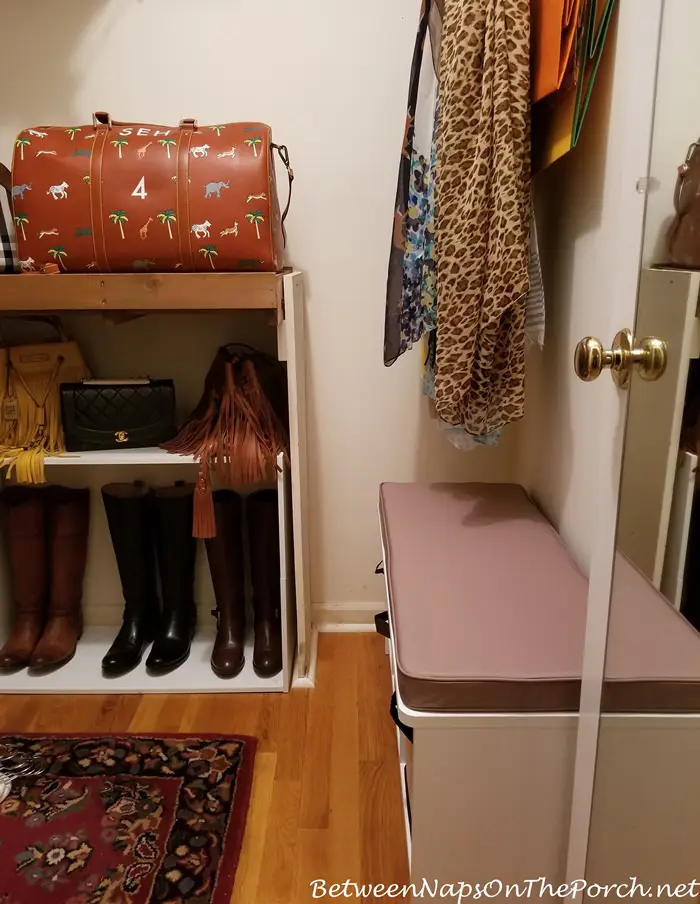
J'ai également ajouté un petit banc bon marché à ce placard. et il s'utilise quotidiennement pendant les mois d'hiver lorsque je mets mes chaussures/bottes.
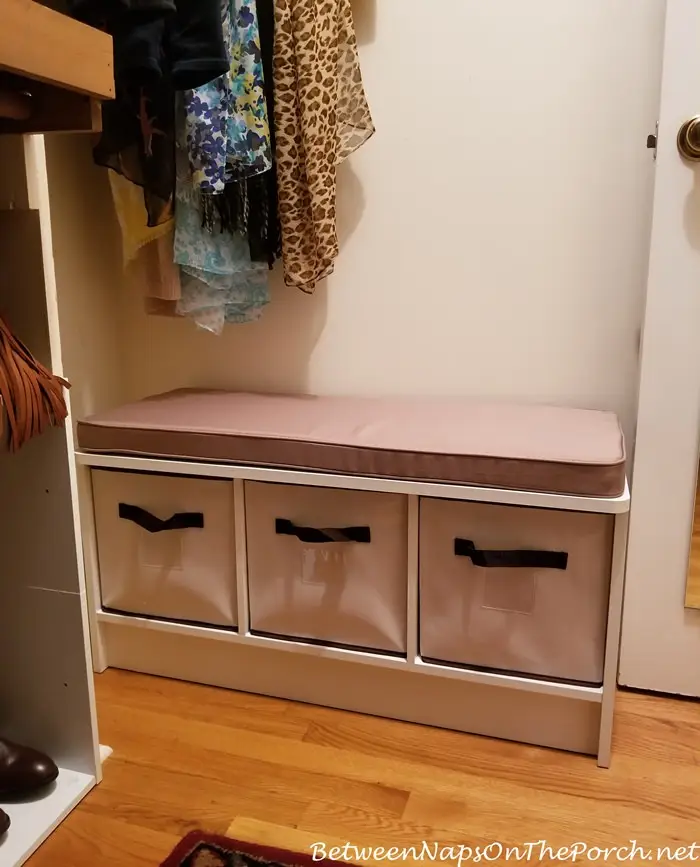
Comme ce placard est directement à côté de la salle de bain principale, ce petit banc est pratique même pendant les mois d'été pendant que je m'habille. En savoir plus à ce sujet avant et après ici : Closet Makeover. Découvrez comment le banc fonctionne pour le stockage ici : Bench Addition.
L'un des projets les plus exigeants en main-d'œuvre que j'ai entrepris au fil des ans a finalement été d'ajouter des armoires de rangement au garage. Cela était particulièrement compliqué car les étagères arrivaient toujours avec de nombreuses pièces cassées. Aargh! J'ai finalement dû le faire livrer dans un magasin voisin où je l'ai récupéré et ramené à la maison dans mon SUV.

Dans le passé, lorsque